300x250 AD TOP

Showing posts with label Repair. Show all posts

Saturday, 3 March 2012

Tagged under: ,

NET Framework Error

Microsoft’s .NET Framework is software designed to help PCs connect to one another, and many programs rely on it. If something goes wrong with your .NET installation, you’ll have trouble and you will get a .NET Framework Initialization Error:
setup008
To correct this ,ensure  that the C:\WINDOWS\Microsoft.NET\Framework (assuming that XP is on the C drive) exists and that it is not empty. If the folder doesn’t exist (or if it’s empty), then install the .NET Framework. Otherwise, open the Registry Editor, and navigate to
HKEY_LOCAL_MACHINE\SOFTWARE\Microsoft\.NETFramework.
In the right pane,double-click the (or create a) String entry named InstallRoot. Set its value to C:\WINDOWS\Microsoft.NET\Framework\. Exit the Registry Editor and restart Windows
setup009
Tagged under: , , ,

Install Windows XP on SATA without a Floppy and with floppy


  • Without a Floppy

image
What ingredients are involved in this operation? The original Windows XP Installation CD, a freeware application named NLite and a blank CD. Moreover, we need the drivers for the SATA controller provided by the manufacturer. In case you did not find any floppy inside the motherboard package or you cannot locate them on the motherboard installation CD, you can consult the manufacturer's website to download the latest versions. To do the trick I have been talking about, it is assumed that you already have a Windows installed on an IDE drive. In case you don't, pay a visit to a friend and ask him to let you use his computer. It won't take too much time, I guarantee.
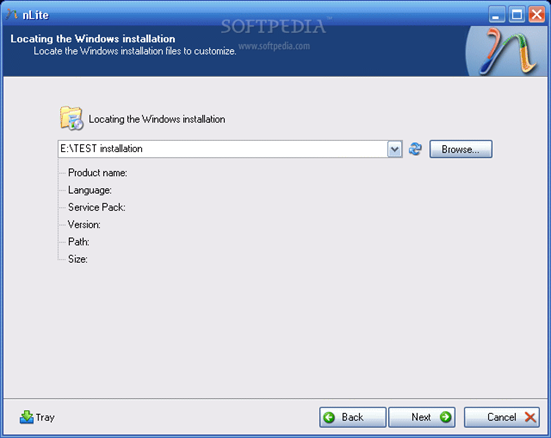
So, download the drivers and unzip them (in case they come archived) in a desired location. Then download and install the Nlite application. When you start the Nlite application, you will be asked to provide the location for the Windows installation package. Insert the genuine Windows Installation CD into the CD drive and, inside the application, select the CD drive letter.
To insert the SATA drivers within the installation package, you need to have it saved on the HDD. Hence, when the warning window appears click OK and select the destination folder for the files to be saved. Make sure that the destination partition / HDD has enough space to store the contents of the installation CD.
Immediately after you have chosen the destination folder, the application will start copying the Windows installation files. When finished, it will display some version information regarding the newly copied Windows Installation Package.
image
image 
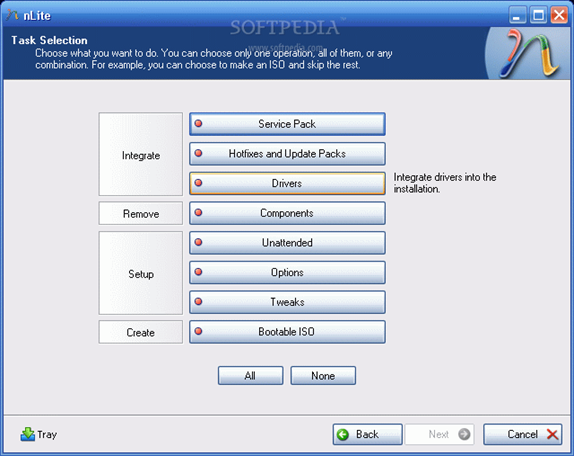
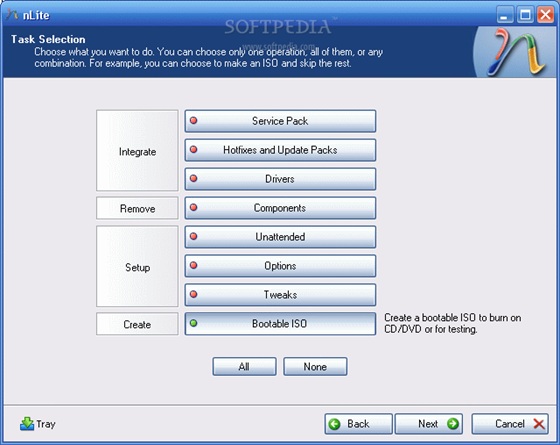
Now, click next twice until you get to a screen where you get options sorted in 4 categories: Integrate, Remove, Setup, Create. We are interested in the integration procedure, therefore select the Drivers button and click next. From the next menu window, click Insert and select multiple drive folder option from the drop down menu. This option permits you to browse to the location where the downloaded drivers are found.
image
image
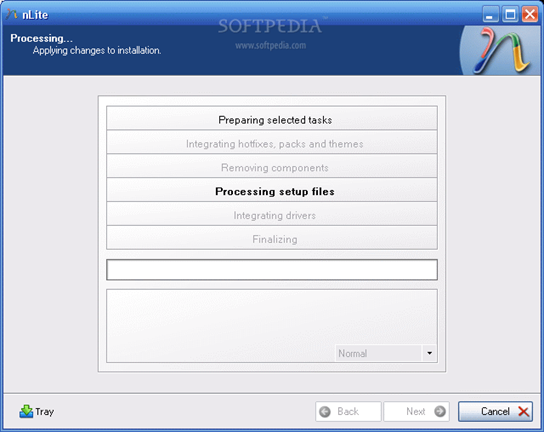
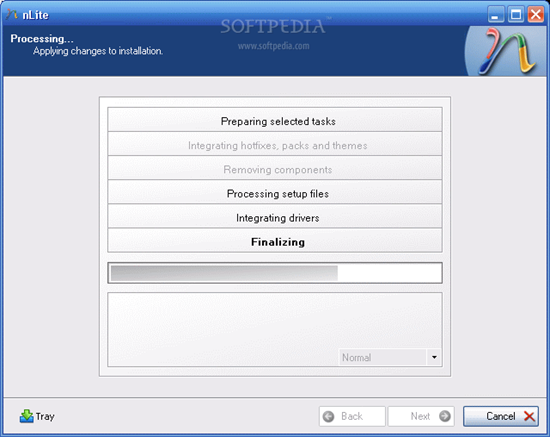
Select the containing directory and click next. You will get a list with the available drivers (in case there are more than one) or simply one driver. Select it (them) and click next. Now the application will ask for the permission to start the integration procedure. Choose Yes and wait for the drivers to be inserted into the installation package.
image
image
image
image
image
With problematic driver being included in the installation package you can install Windows XP on your SATA HDD...but...the installation package is on the HDD. You need a bootable CD in order to start an installation. Don't worry, once the installation package has been adorned with additional user selected drivers it can be transformed into a bootable disk image and later burned on a CD. To encapsulate the installation into a ISO image use the same Nlite application.
Open it, make sure the HDD installation folder is selected and click next. Select "Last session" preset and click next again. Now from the options menu choose Bootable ISO and click next. In the following window, make sure that the mode is set to "Create Image" and click Make ISO. A destination folder is required where the resulting ISO image will be saved. Once the image saving process finished you have the freedom to burn it on a blank CD with whatever you favorite CD burner software may be.
image
image
The new CD will be the twin copy of the Windows Installation CD but with one difference, it includes the SATA driver.
  • With a Floppy

You need the RAID driver for the SATA/RAID controller on your PC's motherboard. It should look like the one shown below, or you can download the driver from motherboard manufacturer's website and copy to root of floppy disk.

Insert your Windows XP setup disk and reboot your PC. Let the PC boot from the CD and run the Windows setup. (You may need to adjust your BIOS to make the PC boot from the CD-ROM)
You see the blue screen of the setup program press F6 when you see it displayed in the white bar along the bottom. You will then be prompted to insert your driver diskette and press ENTER. The diskette will then be read and the will continue along the setup process.
You will then see the following screen.

Select S to Specify Additional Device. It will present a list of drivers which it read from the disk earlier. Select the appropriate driver for your operating system. The setup will continue and this time it will recognize the SATA hard disk drive in your PC.
Tagged under: , ,

Protect your PEN/USB Drive from Virus


imageWorld is shrinking, and so are the data storage devices. One common device which every one use is USB devices like thumb drive, PEN drive, USB Hard disks etc...
After floppy disks which were earlier prone to many viruses, now it is time for USB Devices. Below are some safety precautions that you may perform before transferring data from USB devices.
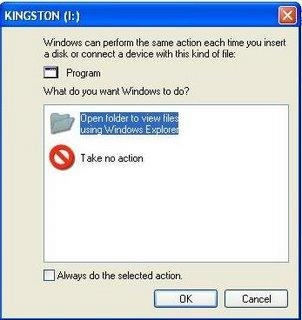
1) When you plug in the USB device in your system (Desktop / Laptop), you will most likely be prompted by a popup window as shown below.
image
2) Dont select any of them, simply click cancel.
3) Goto Start -> Run and type cmd to open the Comman Prompt window
4) Now double click My Computer Icon (which is usually present in the desktop). It should show the list of drives available in this machine. Check the drive letter of the inserted USB Device. (As in above case it is (I:))
5) Go back to the command prompt and type the drive letter and hit Enter.
6) Now type the below command and hit Enter. This command displays all the hidden files and folders in the current working drive (I: Drive in our case)
    I:\> dir/w/o/a/p
7) You will be able to see a list of files, after you run the above command. In the list, check if you see any one of the files mentioned below,
    - Autorun.inf
    - New Folder.exe
    - Bha.vbs
    - Iexplore.vbs
    - Info.exe
    - New_Folder.exe
    - Ravmon.exe
    - RVHost.exe
or any other unknown .exe files that you are unaware of and you have not copied to the device earlier.
8) If you find any one of the files listed above, you are right!!! you have got a virus in your USB device. Don't panic, it will be transferred to your system and start its duties only when you start copying the files to your computer's hard drive.
9) Now that you have confirmed that you have virus in your USB device, now type the following command and hit enter
    I:\> attrib -h-r-s-a *.*
    attrib command is for displaying and changing the attributes of the files.
10) Now Delete each of the files that you were not aware of and found to be on the above list by using the below command and hit enter
    I:\> del <filename>
    For eg. I:\> del Autorun.inf
11) That's it, you did it!!!!!!!! now your USB Device is free of virus.
Note: Some viruses are vulnerable to antivirus softwares. When unnoticed these viruses sits in system registry and doesnot allow the antivirus software to locate the source file. But it generates a virus child file in all the folders of the system. Antivirus software may detect the child file and delete it, but it keeps on generating. It cannot be stopped until source virus file is removed.
Tagged under: ,

Recover Scratched Discs with ISO Puzzle

Dirt spots and small scratches can quickly destroy the surface of disks. This tool reads all sectors of the Data and stores them in an ISO file so that you can return them to CD / DVD.
IsoPuzzle is a freeware that helps save important data from damaged ,bad burned or scratched discs.All good sectors, that are those that can be read without errors, are written correctly and flagged as good while bad sectors will be flagged as bad.
image
This version supports only data CDs and DVDs with sector size of 2048 byte - Audio CD, VCD and SVCD are not supported.For using different drives you can share the image file *.ISO (together with the flag file *.FLG) on a network drive or put it on a portable disk (USB).
|93.6 KB | Freeware
Tagged under: ,

How To Recover a Damaged User Profile in XP

Sometimes you may faced with  an error message as  “The system has recovered from serious error” after system restart or log off. This may due to the user profile in Windows XP might have been damaged.You  may  find that the desktop items are  also missing.

Windows user profile describes the Windows configuration for a specific user, including the user's environment and preference settings. The user profile contains all the files and settings for a particular user, such as installed applications, desktop icons, and color options. When a user profile gets damaged (due to various reasons such as the file system getting corrupted), settings for your ‘My Documents’ may be missing  and settings for Microsoft Outlook and Microsoft Internet Explorer are also may lost.
To  overcome this ,you may have to re-create a new profile.Here is how to create a new profile when your old profile is damaged.
1.Login as Administrator.
2.Backup My Documents folder( C:\Documents and Settings\<old user name>\My Documents folder –assuming OS in your C drive)  to another location in another drive.
3.Also backup the contents of the Favorites Folder.(C:\Documents and Settings\<old user name>\Favorites )
4.Outlook Express users can find the files related to their emails at a location such as"LocalSettings\ApplicationData\Identities\{D10E00AF-FC98-4E44-B5CC-13E6D3AE304} \Microsoft\Outlook Express" folder.
5.Address Book is another important thing you may want to back up. You can find the Address Book file in "Application Data\Microsoft\Address Book" folder. Outlook 2000/XP users will find the PST file in the "Local Settings\Application Data\Microsoft\Outlook" folder.
After you are done backing up your important files, you can proceed with the System Restore.Open Start >> All Programs >> Accessories, select System Tools, now click System Restore. Guidelines is here How to do a System Restore
Creation of new User Account

Make sure that you select Computer Administrator as the account type. Click Create Account to create the new user account.
1.Open the Control Panel and then open User Accounts.
2.Select Computer Administrator as the account type.
3.Click Create Account to create the new user account.


Copy your User Profile

You will now have to copy the old user profile to this newly created one.
1.Log onto the newly created user account and log off. Log back into the administrative account.
2.Open System Properties from the Control Panel and select Advanced tab.

3.Click the Settings button in the User Profiles section. You can now see a User Profiles window that lists the different user profiles present on your computer.

4.Select the old profile in the list and click "Copy To" button.
5.Click the Browse button, locate the Documents and Settings folder, and select the new account. Click OK

6.You will see a confirmation dialog box . Click Yes
7.Close the User Profiles and System Properties window, and log off
Still  if  you are not able to log on to your account, you need to delete the newly created user account and user profile .Log on to the Administrator account, open User Profiles and click Delete.Please note that when you move to a new user profile in this method, you will lose all the personalized settings such as themes, wallpaper, and icons.
You have to  create a new account and a new user profile as mentioned above. You can then manually copy your data files and other parts of the user profile from the original to the new one.
1.Login as Administrator.
2.Open C:\Documents and Settings folder. Locate and open your original account folder. Ensure the enabled viewing of hidden system files and folders  to view all the files present in that folder
3.Copy the contents of the folder containing the data that you want to move to the new user profile.Copy the contents of the Favorites, Outlook Express (or Outlook), and Address Book folders. Make ensure not to  copy any file related to the operating system.
4.Log out of the Administrator account and log on to the new user account
Now you may be able to access all your data files as you did before and also most of your applications.You may need  to recreate all your personalized settings,reinstall or reconfigure some of the applications also  .
After you restored the new user profile, you  do not  require the files and folders of the old profile . You can  get rid of them  by  opening the User Profiles window, selecting them from the list of profiles, and clicking the Delete button.
How to back up the user profile automatically
To safeguard against a repeat of such Profile errors, you can back up your profile each time you log off.

1.Log in to your Administrator account
2.Open  System Properties >Profiles window .Select the new user profile, click Copy To button and type the name of a folder on another drive in the Copy Profile To text box.
3.Open Computer Management. Start>Run "compmgmt.msc" (without the quotes).

4.Go to System Tools\Local Users and Groups\Users folder.
5.Click on your account name and select the Profile tab.
6.Type the path to the backup in the Profile Path text box.
Tagged under: , ,

How To Install Multiple Antivirus Programs

We always wish our computers to be secure from damages especially from Viruses.We use Anti-virus software for our computer in order to protect it from getting viruses. But none of them can be 100% secure to save our computers from Viruses. However we also may think of installing multiple anti-viruses at a same time on our computer.But installing two or more antivirus is not possible , because antivirus software nowadays are so complex and they may conflict with each other causing crashes and blue screens.It also leads to system resources hog  and slows the computer down.
Recently found a tool called Multi AV Scan developed by Gakh from HackHound that allows you to run on-demand scan using 10 types antivirus on your computer.It is possible  to run two or more antivirus  programs with this third party software. Multi AV Scan is a standalone software and it  does not provide real time protection.It is not required to uninstall your current antivirus to run Multi AV Scan.It currently supports A-Squared, Avira AntiVir, BitDefender, ClamWin, DrWeb, Ikarus, McAfee, Solo, Sophos, VBA32.

This program is little buggy.It  will continue  Scanning the whole time without progress unless  you have to put the file that you want to scan in the same folder where  MultiScan.exe installed.If you’re using Avira AntiVir, you need to place Avira license key HBEDV.KEY (you can get it for free here) file in \AVs\AntiVir\ folder.It also  consume  more resources during updating and scanning.It works with XP and Vista
  Part1 Part2 Part3
Tagged under: , , ,

SpyDLLRemover - Advanced Spyware Detection and Removal Tool

Sometimes you have problem with high CPU utilization by System process .For example malicious trojan horse  like Graybird.1.,once it has gained entry, that  will start it's mischief by creating a start-up registry entry. Hereafter, the symptoms include the infected system producing unusual amounts of outbound traffic.febb.dll ,9dd1.dll and wqrgizey.dll  are some of the dll files related to this.SpyDLLRemover is the standalone tool to effectively detect and delete such spywares from the system. It comes with advanced spyware scanner which quickly discovers hidden Rootkit processes as well suspcious/injected DLLs within all running processes.

The DLL search feature helps in finding DLL within all running processes using partial or full name. Then user can choose to remove the DLL from single process or from all loaded processes with just one click.One of the unique feature of SpyDLLRemover is its capability to free the DLL from remote process using advanced DLL injection method which can defeat any existing Rootkit tricks. It also uses sophisticated low level anti-rootkit techniques to uncover hidden userland Rootkit processes as well as to terminate them.

Features
  • Advanced Spyware Scanner which efficiently discovers hidden Rootkit processes as well as suspicious/injected DLLs within all running processes in the system.
  • Detection and removal of hidden userland Rootkit processes using sophisticated techniques such as Direct NT System Call Implementation, Process ID Bruteforce Method (PIDB) as first used by BlackLight and CSRSS Process Handle Enumeration Method
  • State of art technique for completely freeing the injected DLL from remote process based on advanced DLL injection method using low level implementation which defeats any blocking attempts by Rootkits.
  • Sophisticated DLL auto analysis which helps in separating out the legitimate modules/DLLs from the malicious ones. Such DLLs are displayed using different colors representing various threat levels for quicker and easier identification.
  • Integrated online verification mechanism through ProcessLibrary.com to validate any suspicious DLLs. This makes it easy to differentiate between the spyware & legitimate DLLs.
  • ‘DLL Tracer’ feature to search for DLL within all running processes using partial or full name. Then user can choose to remove the DLL from single process or from all loaded processes with just one click.
  • Sort the process/DLL in the list based on various parameters for easier and quicker analysis.
  • Detailed report generation of Spyware scanning result as well as process/DLL list in standard HTML format for offline investigation.
  • View the process/DLL properties for more information by just double clicking on the process/DLL entry in the list.
  • Feature to show all running processes in the system which has loaded the selected DLL. Also user can click on “Remove DLL from ALL’ button to quickly remove any such malicious DLL from all loaded processes.
  • Termination of suspicious or hidden process based on low level implementation which makes it very effective against any Rootkit techniques.
  • Displays detailed information about all running processes on the system
  • Shows detailed information about each loaded DLLs within process to make it easier for manual analysis.
  • It is standalone tool which does not require any installation and can be executed directly.
  • Enriched user interface along with more user friendly options makes it the cool tool.
Download Spy DLL Remover |1.03MB|OS: Windows XP, 2003, Vista, Longhorn and Windows 7.
Tagged under: , ,

Microsoft Standalone System Sweeper

These days many viruses and malwares  target  your PC , rendering the computer unbootable. Microsoft Standalone System Sweeper is a recovery tool that can help you start an infected PC and perform an offline scan to help identify and remove viruses, trojans, rootkits and other forms of malware effectively.

It can also be used if you cannot install or start an antivirus solution on your PC, or if the installed solution can’t detect or remove malware on your PC.This tool installs itself to either a USB drive or a blank CD/DVD disc and creates a bootable media that can be used to recover your system in the event of a malware or virus infection.

please ensure  that you have a blank CD, DVD, or USB drive with at least 250 MB of space, and an active Internet connection .To use Standalone System Sweeper ,users need to boot from the disc or USB device which in turn loads the tool that gives you the options to scan the PC and recover it.

It will load the Windows preinstall environment to run the Microsoft Standalone System Sweeper application for scanning .This  will first scans your boot sector for any corrupted files or settings. It then scans your system for any known malware or infections.

Download: http://go.microsoft.com/fwlink/?LinkId=215854
Tagged under: , , , , ,

How to fix corrupt windows user profile

Every user in the Windows OS has a user folder associated with the account name which  stores computer settings and data.A common problem with Windows machines is a corrupt user profile.So windows fails to recognize the user profile and folder that is linked to the user account.This can be caused by a hard drive error, joining/leaving a domain, file system issues and a change of username.What will happen in this case is that the next time the user logs-on, a fresh, empty profile will be created, named 'user.domain' or 'user.computer' instead of just 'user' -and from that point on, the new profile will be used instead of the correct one.
Before we start learning how we fix any corrupt account make sure you have a an account which either is admin or is  admin privileged.
All the Windows User Profiles are located under C:\Users\UserName which contains all our settings. Now go to your account and unhide hidden folders and uncheck Hide Protected operating system files. You would see three files NTUSER.DAT, NTUSER.dat.log and ntuser.ini which you will need to be careful about.

  • Login with your admin account and  create new account.
  • Now identify which user profile is corrupted and  go to that folder which will be like C:\Users\UserName
  • Unhide Folders / Files and display system files
  • Copy everything from this folder  except three files NTUSER.DAT, NTUSER.dat.log and ntuser.ini
  • Go to new account folder located under C:\users and paste all the files you copied in above step.
  • Logoff and login to the new account to confirm.
  • Delete the old account.

This should fix your problems. Remember many a times because of some bug you might see Windows giving you a brand new profile but if you logoff and try logging in again you would see the issues getting fixed.
There is another alternative called as Reprofiler a software which can also help you in fix these issues by remapping users to their profiles, fixing registry settings and permissions which is required to fix any corrupt windows account.
image
It displays all the user accounts above and all the windows users folder below. Now to fix it or map to any other account you can just select first a user name above and a folder below and then hit Assign. This will make sure it copies and assigns proper settings. You can also remove / detach folders which is useful when it comes to erase the data.
Download
Tagged under: , ,

“Show Hidden Files and Folders” not Working ?

Do you encounter problems like when you go to Windows Explorer, Tools Menu--->Folder Options--->View Tab--->Hidden Files and Folders--->"Show hidden Files and Folders"and you would like to view hidden files and folders but after applying, it will not actually show the hidden files and folders, and even when you tried it all over, it will just come back.

It was probably some virus attack after which the Windows registry was not being updated properly.There are so many methods to restore back the registry.If one method is not working, you can  try another one.
Method-1
Go to registry editor by running regedit in the run box.
Go to this key:
HKEY_CURRENT_USER\Software\Microsoft\Windows\CurrentVersion\Explorer\Advanced\Hidden
In the right hand area, double click hidden and change the value to 1.

Now you’re all set to go. Check it in your tools menu if the changes have taken effect
Method-2

1. Click “Start” -> “Run…” (or press Windows key + R)
2. Type “regedit” and click “Ok”.
3.Find the key:
HKEY_LOCAL_MACHINE\SOFTWARE\Microsoft\Windows\CurrentVersion\Explorer\Advanced\Folder\Hidden\SHOWALL
4. Look at the “CheckedValue” key. This should be a DWORD key. If it isn’t, delete the key.
5. Create a new key called “CheckedValue” as a DWORD (hexadecimal) with a value of “1”.
6.Also look for key that says “DefaultValue” and change its value to “2“
7. The “Show hidden files & folders” check box should now work normally
image
Method-3
Download this Reg key, Unzip it > Right Click on "fix.reg" > Choose "MERGE"
Now try Unhiding your Hidden Files
Method-4
Open command prompt and execute this command---> regsvr32 /i shell32.dll.That will return the Default Local Machine entries which may have been changed back to their individual defaults so that when you select not to hide files, they are shown etc.Then you can go into folder options and reset your options.Some malware is using this ploy too, like infected flash drives. so it is recommended that every time you insert a flash disk scan it first.
Tagged under: , , , ,

Free Optimization Software For Windows 7

PC Brother System Care is an all-in-one software for Windows 7 that helps you protect and optimize Windows in a few steps.  The application packs-in various tools required to keep your system in top notch condition.

On the first run it will scan your system for performance related issues and suggests the areas that can be optimized to improve overall performance of your PC. Here are the key features of PC Brother System Care:

# Optimize – Speeds up PC quickly and easily by using one-click- optimize
# Security – Automatically detects  security risks and reminds users to solve them in time
# Tools- Managers autorun, running processes, services, network connections and more
# PC info – Displays system software and hardware details

There are some other features such has Hardware Management an Software Management that are available only in the paid version. So, you can only clean and optimize your PC with this free version.

The Network Optimization section looks pretty impressive as it offers you view and modify IP configuration, repair network, correct and restore connection, speedup network and manage system applications which are accessing network.

The only thing we didn’t like about this software is that it displays some false suggestions related to your Antivirus software. For instance, it might ask you to turn on Antivirus software even if the Antivirus software is running.

Friday, 2 March 2012

Tagged under: , ,

Repair Broken AVI Video Files with Fix Player

Many occasions AVI video files  downloaded from  Internet or torrent sites are not perfect and complete.Sometimes the video files copied from CD / DVD can't be played.This may due the file have not completely copied from CD, DVD Or files may corrupted.As a result Windows Media Player or other video player won't play such AVI video files.
Fix Player is a simple and useful free AVI player which helps you to repair and to watch such corrupted  AVI video files on your PC

You can repair your AVI file in these cases:
  1. Video file have not totally copied from CD, DVD or other source
  2. Video freezing
  3. Video can't be played
Key Features
  1. Detect the bad data
  2. Repair the index of AVI file
  3. Support the Standard AVI file format (Microsoft Video for Windows)
  4. Repair local avi file
  5. Preview remote file
  6. Repair avi file from CD or DVD disk The license of this video & dvd software is Freeware, you can free download and free use this Video & DVD software

Fix Player | OS:Windows2000 , 2003 , NT , XP | 2.69MB

DivFix is another  utility  which fixes broken DivXs, AVIs, XviDs. DivXFix, AVIFix, XviDFix . With this tool  you can reconstruct the damaged videos. DivFix lets you to view videos before they have completely downloaded, giving you the possibility of verifying their quality.

dl2 DivFix110.zip | 266 KB