300x250 AD TOP

Showing posts with label USB. Show all posts

Sunday, 4 March 2012

Tagged under: ,

Safely Remove Your USB Devices with EjectUSB


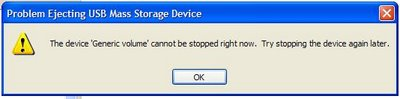
Do you having hard time to safely remove your USB devices from your Windows and often encountered this error message, “The device cannot be stopped right now. Try stopping the device again later”? How can you put an end to this problem?
image
Well, I frequently ran into the same problem too last time but now not anymore after I’ve found Unlocker. You can read my previous blog entry to learn more about this small but useful utility. Using Unlocker is one of the solutions for this problem. The reason why this happen is that there are still programs that run from the USB device during the moment you try to eject the USB device.
Besides Unlocker, EjectUSB is another essential Windows tool that you can try out. This open-source program will close all programs running from your USB device and then safely eject the USB drive. Click here to see EjectUSB in action. Other functionalities that EjectUSB offers are flushing the file cache, closing Explorer windows and removing registry entries and Recent Document shortcuts referencing the specified USB drive.
To use EjectUSB, you need to first extract the content of the downloaded zip file onto your USB device. Next, you need to run the “EjectUSB.exe” from the USB device that you are attempted to eject. Then, let the program take care the rest of the task. So easy!
EjectUSB is compatible with all Windows OS. If you ask me which one do I prefer between Unlocker and EjectUSB, I will pick EjectUSB.
Download EjectUSB Now! | 252 KB
Tagged under: ,

USB Device not Recognized by Vista


When USB Drive  plugged into your computer causes the sound  alert to go off but does not get recognized by Microsoft Vista.However, if you reboot your machine the device gets recognized.But it is painstaking  to reboot your Sparksspacemachine every time.This  may due to   corrupted system files .
Click the “Start” menu and type “Device Manager” in the search field to open up the Device
Manager. Navigate to the portion of the dialog box that has all your USB controllers enlisted. Right-click on all of them and delete them. Reboot Windows Vista. When Vista reboots it will detect the missing USB controllers and will add the devices automatically. This will take care of the problem if file corruption is the cause. Another means of troubleshooting a problem of this nature is to enable Write Caching.
extend Reboot your computer so that the drive gets detected.
extend Click “My Computer”
extend Right-click on the external drive.
extend Click “Properties”.
extend Click “Properties” under the “Hardware” tab.
extend Click “Change settings”.
extend In the next dialog box click the “Policies” tab.
extend Check the “Enable write caching on the disk” checkbox.
extend Once done, click “OK”
extend Reboot the system.
Tagged under: , , ,

Keep your Desktop In your Flash Drive


image In using computers everyday you likely send email, check the news, track finances. In using different computers you probably have different programs on each machine, maybe even different operating systems. Have you wished each machine had the same applications? Or that the bookmark you just added to your browser were on the other machine? Have you worried about computer viruses or your child deleting the wrong files? LivePCs can help you in each case.

A LivePC is a virtual computer. You can run a different operating system and different
applications within it than the computer normally runs. You can run this virtual computer directly
on a computer or from a portable drive on most computers. LivePCs can be found in The Lab on
MokaFive.com or you can make, and even share, your own using MokaFive Creator.

Variety


LivePCs are run from our MokaFive Player on Windows XP, Windows Vista, Intel based Mac OS X
machines, or BareMetal. You can run many different LivePCs from the Player. Have an
application you'd like to use that only works under DOS? You can have a DOS LivePC and add
that application. Would you like to run some applications under Linux? Download a Linux LivePC.
Would you like to have a safe games play space for your child? Launch a child friendly LivePC

Offline Use


LivePCs can be set for use without access to the internet. You could compose an email at the top
of Mount Everest on your LivePC to send once you are again connected to the web.

Security


LivePCs run on your computer but they are copies of the ones maintained on our servers. The
LivePC operating system and applications are kept separate from your personal data. If your
LivePC gets a virus, it will be removed when you exit and re-launch the LivePC. The operating
system and applications on a LivePC are kept clean by matching them to the LivePC in The Lab
on MokaFive.com. LivePCs are also independent. They are not able to open or affect files in
other LivePCs.

Portability


You can put LivePCs and the Player on a memory card, USB flash drive, USB hard disk, or an
iPod and take them to another machine. You will be able to take your LivePCs between Intel
based Macs and Windows XP or Vista machines. When installed using BareMetal you can run
from a machine which allows you to boot from USB.

Backups (Windows portable installation only)


Your portable LivePCs and your personal data can be backed up automatically to a Windows XP
or Vista computer. Should you lose your portable drive you can create a new one from the
backup.

Personalization


You can also create and share your own LivePCs, either by modifying existing LivePCs or creating your own from scratch. You can then register your LivePC at MokaFive.com to share
with the world or just your friends, or you can keep it private. By posting and subscribing to your
own LivePC you can be assured that any spyware you pickup in your LivePC virtual computer will
be removed the next time you launch it.
Demo: http://www.mokafive.com/mokafive-demo.php
Download: http://www.mokafive.com/solutions/player.php
Tagged under: ,

HP USB Disk Storage Format Tool - v2.1.8


HP USB Disk Storage Format Tool  will format any USB flash drive, with your choice of FAT, FAT32, or NTFS partition types.Additionally, the drive can be made bootable by using system files from Windows 98 startup-disks.
By default on USB flash file system of FAT32, because of what files measuring more than 2 Gb writing down is not possible. By the program HP USB Disk Storage Format Tool it is possible to change the file system of your flash on NTFS.It has a graphical interface very similar to that of the Windows format tool.

Features
  • Allows creation of a FAT32 volume larger than 32 GB.
  • Fixes installation issue where installation process stopped after the earlier version of software was uninstalled and the new software was not automatically installed. The installation process now restarts automatically to install the new software after uninstalling the older version
HP USB Disk Storage Format Tool  Or http://www.mediafire.com/?trnhjngzwtz | 1.97MB | Freeware |OS:Windows 2K/XP
Tagged under: ,

Encryption Software Protect your USB Stick-Rohos Mini Drive


1 Comments » Those who has Megabytes of sensitive files on the USB drive and seriously concerned with data security cannot imagine their USB stick without the hidden volume that is created using this tool.
Rohos Mini Drive creates hidden and encrypted partition on the USB flash drive memory or on your computer. You work with the files on the hidden partition without opening a special program. Those who have megabytes of sensitive files on the USB drive and seriously concerned with a data security, cannot imagine their USB stick without the hidden volume that is created using this tool.
rohos
Main Features:
» Creates a virtual encrypted partition volume (disk) within a USB flash drive free space.
» Automatically detects your USB stick config and creates encrypted partition.
» Program does not require installation to work with encrypted partition on a guest computer. You can start it right from USB drive.
» Encrypted partition is protected by password.
» Encryption is automatic and on-the-fly.
» Encryption algorithm: AES 256 bit key length. NIST approved.
» Rohos Disk Browser to open encrypted partition without having Admin rights
encrypted Disk-on notifications helps you to know when this volume is visible or disabled. If you click on the balloon the Explorer window will be opened on the disk.
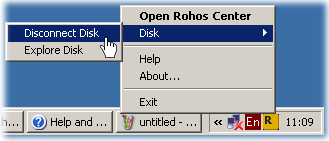
If you need to open secured volume on a guest computer, you just click Rohos icon on the USB flash drive root folder and enter disk password. Rohos will start a volume and will sit near the system clock to close the disk when you’ll finish.
disconnect
Despite the name “Mini” the program provides a decent USB flash drive password protection, has all necessary functions and wonderful user interface.
download
SysReq:Windows 2000/XP/2003/Vista/ USB 1.1/2.0 port /USB flash drive

Saturday, 3 March 2012

Tagged under: , ,

Prevent Unauthorized use of USB Ports

If proper steps are not taken to secure your computing environment, a USB flash drive would be an ideal means of collecting valuable information and literally pocketing it. So what steps can be taken to secure your environment against these potentially sinister little devices?
The freeware NetWrix USB Blocker enforces centralized access control to prevent unauthorized use of removable media that connects to computer USB ports, for example, memory sticks, removable hard disks, iPods, and more. USB port access control is a very  important aspect of your endpoint security, no matter how good your antivirus and firewall are. The USB device lockdown protects your network against malware and prevents theft of sensitive corporate data.
Unlike other solutions, it requires no deployment of agents on client computers. Another advantage of the tool is simplicity, only a couple of mouse clicks to get the work done. And the most exciting: the software is completely free of charge.

Benefits: 1) Prevents unauthorized use of removable devices.
2) Hardens endpoint security.
3) Enables regulatory compliance, such as SOX, GLBA and HIPAA.
4) Freeware! Saves your IT buck for other important projects.
Features:
1) Seamlessly integrates with Active Directory.
2) Requires no client deployment (no agents).
3) Fully centralized management.
4) Very simple to use, no monster tools and long learning curves
 NetWrix USB Blocker | Freeware | 795 KB
Tagged under: , ,

Protect your PEN/USB Drive from Virus


imageWorld is shrinking, and so are the data storage devices. One common device which every one use is USB devices like thumb drive, PEN drive, USB Hard disks etc...
After floppy disks which were earlier prone to many viruses, now it is time for USB Devices. Below are some safety precautions that you may perform before transferring data from USB devices.
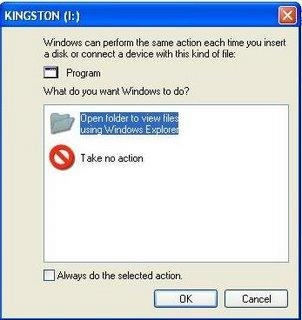
1) When you plug in the USB device in your system (Desktop / Laptop), you will most likely be prompted by a popup window as shown below.
image
2) Dont select any of them, simply click cancel.
3) Goto Start -> Run and type cmd to open the Comman Prompt window
4) Now double click My Computer Icon (which is usually present in the desktop). It should show the list of drives available in this machine. Check the drive letter of the inserted USB Device. (As in above case it is (I:))
5) Go back to the command prompt and type the drive letter and hit Enter.
6) Now type the below command and hit Enter. This command displays all the hidden files and folders in the current working drive (I: Drive in our case)
    I:\> dir/w/o/a/p
7) You will be able to see a list of files, after you run the above command. In the list, check if you see any one of the files mentioned below,
    - Autorun.inf
    - New Folder.exe
    - Bha.vbs
    - Iexplore.vbs
    - Info.exe
    - New_Folder.exe
    - Ravmon.exe
    - RVHost.exe
or any other unknown .exe files that you are unaware of and you have not copied to the device earlier.
8) If you find any one of the files listed above, you are right!!! you have got a virus in your USB device. Don't panic, it will be transferred to your system and start its duties only when you start copying the files to your computer's hard drive.
9) Now that you have confirmed that you have virus in your USB device, now type the following command and hit enter
    I:\> attrib -h-r-s-a *.*
    attrib command is for displaying and changing the attributes of the files.
10) Now Delete each of the files that you were not aware of and found to be on the above list by using the below command and hit enter
    I:\> del <filename>
    For eg. I:\> del Autorun.inf
11) That's it, you did it!!!!!!!! now your USB Device is free of virus.
Note: Some viruses are vulnerable to antivirus softwares. When unnoticed these viruses sits in system registry and doesnot allow the antivirus software to locate the source file. But it generates a virus child file in all the folders of the system. Antivirus software may detect the child file and delete it, but it keeps on generating. It cannot be stopped until source virus file is removed.
Tagged under: , ,

"How to Disable Use of USB Storage Devices in Windows?"


  image What happens if the users bring their own USB memory sticks and connect them to the computers at their office?With the size of USB storage devices increasing so much in recent years, the risk is increasing as more and more data could possibly be stolen or lost accidentally.
You can restrict access for installing new USB storage devices by changing the permissions of these files:
Type %windir%\inf in Explorer address bar or RUN dialog box and press Enter. It’ll open “inf” folder.
  • %SystemRoot%\Inf\Usbstor.pnf
  • %SystemRoot%\Inf\Usbstor.inf
To assign a user or group Deny permissions to the Usbstor.pnf and Usbstor.inf files, follow these steps:
  • Start Windows Explorer, and then locate the %SystemRoot%\Inf folder.
  • Right-click the Usbstor.pnf file, and then click Properties.
  • Click the Security tab.
  • In the Group or user names list, click the user or group that you want to set Deny permissions for.
  • In the Permissions for UserName or GroupName list, click to select the Deny check box next to Full Control, and then click OK.
    Note In addition, add the System account to the Deny list.
  • Right-click the Usbstor.inf file, and then click Properties.
  • Click the Security tab.
  • In the Group or user names list, click the user or group that you want to set Deny permissions for.
  • In the Permissions for UserName or GroupName list, click to select the Deny check box next to Full Control, and then click OK.
image
You can disable USB storage access for a certain group of users this disabling and re-enablement of USB ports is based on a simple registry entry
If a USB storage device is already installed on the computer, set the Start value in the following registry key to 4:
HKEY_LOCAL_MACHINE\SYSTEM\CurrentControlSet\Services\UsbStor
When you do so, the USB storage device does not work when the user connects the device to the computer. To set the Start value, follow these steps:
  • Click Start, and then click Run.
  • In the Open box, type regedit, and then click OK.
  • Locate, and then click the following registry key: HKEY_LOCAL_MACHINE\SYSTEM\CurrentControlSet\Services\UsbStor
  • In the right pane, double-click Start.
  • In the Value data box, type 4, click Hexadecimal (if it is not already selected), and then click OK.
  • Quit Registry Editor
image
To setup read only USB storage device operation, follow these steps below:
1. Click on the Start Button and type in Regedit and hit Enter.
2. Navigate through HKEY_LOCAL_MACHINE\SYSTEM\CurrentControlSet\Control.
3. Right click on Control and select New and then Key. Call the new key StorageDevicePolicies.
4. Right click on StorageDevicePolicies and select New and then Dword. Call the new dword WriteProtect.
5. Right click on WriteProtect and select Properties. Set the value to 1 and hit OK.
The computer is now configured to disable writing to USB storage devices.
Free tool - http://www.intelliadmin.com/blog/2007/01/disable-usb-flash-drives.html (two versions: local and remote)
To re-enable USB storage devices, you will need to restore the original permissions. From Windows 2000, or Windows XP  in Safe Mode:
  1. Click Start and then Run... and type %systemroot%\inf
  2. Look for usbstor.inf, right-click on it and click Properties.
  3. Click the Security tab, remove "SYSTEM" from the list.
  4. Click "Advanced..." and turn on "Allow inheritable permissions..." Click OK to save the change and OK again to close the Properties window.
  5. Repeat for usbstor.pnf.
Software wroth to try : Windows Network USB Drive Blocker 2.0.1.5