300x250 AD TOP

Showing posts with label Network. Show all posts

Saturday, 3 March 2012

Tagged under:

Creating MAP Drive with bat file

net use \\fileserver\ServerUsers\Tony reeddopet /User:SALES.DOPET\TONY
net use /persistent:yes
Classical Palace Network Settings..
MAPDRIVE.BAT
NET USE H: \\System2\SHARE\SYSTEM2 /persistent:yes
copy this command notepad paste it and save name as mapdrive.bat and right click start buttorn and open and navigate programs and startup and  right click new short cut and create link for this file thatz it..
i t will come h: drive letter in my computer..
Tagged under:

How can I configure TCP/IP settings from the Command Prompt? (Changing IP from Command Prompt)

With Netsh.exe you can easily view your TCP/IP settings. Type the following command in a Command Prompt window (CMD.EXE):
netsh interface ip show config
With Netsh.exe, you can easily configure your computer's IP address and other TCP/IP related settings. For example:
The following command configures the interface named Local Area Connection with the static IP address 192.168.0.100, the subnet mask of 255.255.255.0, and a default gateway of 192.168.0.1:
netsh interface ip set address name="Local Area Connection" static 192.168.0.100 255.255.255.0 192.168.0.1 1
(The above line is one long line, copy paste it as one line)
Netsh.exe can be also useful in certain scenarios such as when you have a portable computer that needs to be relocated between 2 or more office locations, while still maintaining a specific and static IP address configuration. With Netsh.exe, you can easily save and restore the appropriate network configuration.
First, connect your portable computer to location #1, and then manually configure the required settings (such as the IP address, Subnet Mask, Default Gateway, DNS and WINS addresses).
Now, you need to export your current IP settings to a text file. Use the following command:
netsh -c interface dump > c:\location1.txt
When you reach location #2, do the same thing, only keep the new settings to a different file:
netsh -c interface dump > c:\location2.txt
You can go on with any other location you may need, but we'll keep it simple and only use 2 examples.
Now, whenever you need to quickly import your IP settings and change them between location #1 and location #2, just enter the following command in a Command Prompt window (CMD.EXE):
netsh -f c:\location1.txt
or
netsh -f c:\location2.txt
and so on.
You can also use the global EXEC switch instead of -F:
netsh exec c:\location2.txt
Netsh.exe can also be used to configure your NIC to automatically obtain an IP address from a DHCP server:
netsh interface ip set address "Local Area Connection" dhcp
Would you like to configure DNS and WINS addresses from the Command Prompt? You can. See this example for DNS:
netsh interface ip set dns "Local Area Connection" static 192.168.0.200
and this one for WINS:
netsh interface ip set wins "Local Area Connection" static 192.168.0.200
Or, if you want, you can configure your NIC to dynamically obtain it's DNS settings:
netsh interface ip set dns "Local Area Connection" dhcp
As you now see, Netsh.exe has many features you might find useful, and that goes beyond saying even without looking into the other valuable options that exist in the command.

Friday, 2 March 2012

Tagged under: ,

Hide your Vista Computer on the Network

Windows Vista includes the software components that implement the LLTD protocol. For other devices on the network to be displayed on the map, they must enable a discovery protocol that can respond to the mapping requests from the Windows Vista-based computer.
image
Due to security or personal reasons one might want to have their computer "seen", i.e. to be in a discoverable state, while another person might want to avoid having their computer discovered by other networked computers. Therefore, in Vista, there is an option to make your computer "go away", disappear, and not be seen on the network map.
Note: Not having your computer displayed on the network map does not mean it cannot be accessed. If you want to prevent people from gaining access to your computer's shares and other services, make sure you properly configure it and secure it with either the built-in Windows Firewall, or a 3rd-party firewall.
Here are some of the reasons why a computer running Vista may not appear in the network map:
  1. The computer is running Windows Vista and is connected to a network that is assigned to the "Public place" network location. 
  2. The computer is running Windows Vista and the Link Layer Topology Discovery (LLTD) protocol is disabled on the network adapter. Windows uses the LLTD protocol to map computers and devices on a network. 
    image
  3. The computer is running Windows Vista has network discovery is turned off. 
    image
  4. The computer is running Windows XP and firewall settings are preventing Windows from detecting it. Another method of hiding your Vista computer in the network map is by performing the following task:
    1. In the Start Menu's Run command type CMD and press Enter. You can type CMD in the Search bar if your Run menu isn't showing.
    2. In the command prompt window enter the following command:  Net config server /hidden:yes
      This command will hide you from the network map but your shared folders can still be accessed.
      To check if your computer is hidden in the network neighborhood type this in the command prompt:
      C:\Windows\System32>Net config server
      Server Name        \\APOLLO
                      _________

      Server Comment
      Software version    Windows Vista (TM) Ultimate
      Server is active on
          NetbiosSmb (APOLLO)
          NetBT_Tcpip_{28037B04-41B5-466E-B1B9-39C399011DE8} (APOLLO)
          NetBT_Tcpip_{497F17A7-2B9F-433D-BAFF-5761B7D878D5} (APOLLO)
          NetBT_Tcpip_{D04E509A-239D-4F9A-A97B-3FAB3DC3C99E} (APOLLO)
          NetBT_Tcpip_{F6182BAD-1FE0-4128-8FA3-7550A00B7E8B} (APOLLO)

      Server hidden    Yes
      Maximum Logged On Users        10
      Maximum open files per session    16384
      Idle session time (min)        15
      The command completed successfully.

      Note it might take a few moments for the computer to disappear from the network map.
      To un-hide your computer, in the command prompt window enter the following command:
      Net config server /hidden:no
Tagged under: , ,

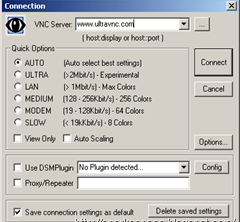
Ultra VNC - Remote Desktop Control software

UltraVNC is an easy to use computer program that can display a screen of another computer (via Internet or network) on your screen. UltraVNC will allow users you to use their mouse and keyboard to control the other PC remotely. It means that you can work on a remote computer, as if you were sitting in front of it, right from your current location.
  image
uVNC is extremely full featured and easy to set up. The quality of the image coming across is wonderful, it feels as if you’re sitting right there in front of the computer
Download icon|Installation Guidelines |Freeware
Tagged under: ,

Setting up a VPN server in Windows XP

1. Click Start | Control Panel.
2. In the Control Panel, open the Network Connections applet.
3. In the Network Connections window (see Figure A), open the New Connection Wizard.
Figure A

The Network Connections window
4. On the Welcome To The New Connection Wizard page, click Next.
5. On the Network Connection Type page (see Figure B), select the Set Up An Advanced Connection option.
Figure B

On the Advanced Connection Options page (see Figure C), select the Accept Incoming Connections option and click Next.
Figure C

Configuring XP to accept incoming connections
7. On the Devices For Incoming Connections page (see Figure D), you can select optional devices on which you want to accept incoming connections.
Figure D

Note that you are not presented with any of the network interfaces on the computer.
8. On the Incoming Virtual Private Network (VPN) Connection page (see Figure E), select the Allow Virtual Private Connections option and click Next.
Figure E

9. On the User Permissions page (see Figure F), select the users that are allowed to make incoming VPN connections. Click Next.
Figure F

Any user that isn’t selected won’t be able to initiate an incoming connection.
10. On the Networking Software page (see Figure G), click on the Internet Protocol (TCP/IP) entry and click the Properties button.
Figure G

Configuring TCP/IP properties
11. In the Incoming TCP/IP Properties dialog box (see Figure H), place a check mark in the Allow Callers To Access My Local Area Network check box. This will allow VPN callers to connect to other computers on the LAN. If this check box isn’t selected, VPN callers will only be able to connect to resources on the Windows XP VPN server itself. Click OK to return to the Networking Software page and then click Next.
Figure H

Granting LAN access to callers
12. On the Completing The New Connection Wizard page, click Finish to create the connection.
After the Incoming Connection is complete, right-click on the connection in the Network Connections window and select the Properties command (see Figure I).
Figure I

Accessing the properties of the VPN server link
When you place a VPN server behind your firewall, be sure to enable TCP port 1723.
Tagged under: ,

Configure a VPN client with Windows XP

If you want to configure a VPN connection from a Windows XP client computer you only need what comes with the Operating System itself, it's all built right in. To set up a connection to a VPN, do the following:
  1. On the computer that is running Windows XP, confirm that the connection to the Internet is correctly configured.
  • You can try to browse the internet
  • Ping a known host on the Internet, like yahoo.com, something that isn’t blocking ICMP
  1. Click Start, and then click Control Panel.
  1. In Control Panel, double click Network Connections
  1. Click Create a new connection in the Network Tasks task pad
  1. In the Network Connection Wizard, click Next.
  1. Click Connect to the network at my workplace, and then click Next.
  1. Click Virtual Private Network connection, and then click Next.
  2. If you are prompted, you need to select whether you will use a dialup connection or if you have a dedicated connection to the Internet either via Cable, DSL, T1, Satellite, etc.  Click Next.
  1. Type a host name, IP or any other description you would like to appear in the Network Connections area. You can change this later if you want. Click Next.
  1. Type the host name or the Internet Protocol (IP) address of the computer that you want to connect to, and then click Next.
  2. You may be asked if you want to use a Smart Card or not.
  1. You are just about done, the rest of the screens just verify your connection, click Next.
  1. Click to select the Add a shortcut to this connection to my desktop check box if you want one, if not, then leave it unchecked and click finish.
  2. You are now done making your connection, but by default, it may try to connect. You can either try the connection now if you know its valid, if not, then just close it down for now.
  1. In the Network Connections window, right-click the new connection and select properties. Let’s take a look at how you can customize this connection before it’s used.
  2. The first tab you will see if the General Tab. This only covers the name of the connection, which you can also rename from the Network Connection dialog box by right clicking the connection and selecting to rename it. You can also configure a First connect, which means that Windows can connect the public network (like the Internet) before starting to attempt the ‘VPN’ connection. This is a perfect example as to when you would have configured the dialup connection; this would have been the first thing that you would have to do. It's simple, you have to be connected to the Internet first before you can encrypt and send data over it. This setting makes sure that this is a reality for you.
  1. The next tab is the Options Tab. It is The Options tab has a lot you can configure in it. For one, you have the option to connect to a Windows Domain, if you select this check box (unchecked by default), then your VPN client will request Windows logon domain information while starting to work up the VPN connection. Also, you have options here for redialing. Redial attempts are configured here if you are using a dial up connection to get to the Internet. It is very handy to redial if the line is dropped as dropped lines are very common.
  1. The next tab is the Security Tab. This is where you would configure basic security for the VPN client. This is where you would set any advanced IPSec configurations other security protocols as well as requiring encryption and credentials. 
  1. The next tab is the Networking Tab. This is where you can select what networking items are used by this VPN connection.
  1. The Last tab is the Advanced Tab. This is where you can configure options for configuring a firewall, and/or sharing.

Connecting to Corporate

Now that you have your XP VPN client all set up and ready, the next step is to attempt a connection to the Remote Access or VPN server set up at the corporate office. To use the connection follow these simple steps. To open the client again, go back to the Network Connections dialog box.
  1. One you are in the Network Connection dialog box, double-click, or right click and select ‘Connect’ from the menu – this will initiate the connection to the corporate office.
  1. Type your user name and password, and then click Connect. Properties bring you back to what we just discussed in this article, all the global settings for the VPN client you are using.
  1. To disconnect from a VPN connection, right-click the icon for the connection, and then click “Disconnect”
Tagged under: ,

Free Remote Shutdown Utility for Any Computer On The Network

LanShutDown is a FREE program which lets you shutdown, restart, log off any computer on your network, but the primary requirement to perform these actions remotely is you need to have administrative privileges.You can run this tool and shutdown any computer running windows 2000, XP or 2003. The program package includes two console programs with which you can use LanShutDown tool from command line also. With the command line version of this tool you can automate the shutdown and reboot of your computer.It will automatically detect all the computers connected to your network with their IP address and names. You can also forcefully terminate the applications running on the remote computer which you want to shutdown.

The LanShutDown package includes two console programs
1. LanShutdownN (LanShutdownC.exe) - consol program for computer remote shutdown;
2. ShutdownN (ShutdownC.exe) - consol program to control local computer power.
This free remote shutdown tool makes it very simple to shutdown any computer on your network and but still if you want to use the default shutdown dialog in windows to shutdown any computer in your network.
Geeky Way To Remote Shutdown Any Computer On The Network
1. Open command prompt and type shutdown –i and press Enter
2. Add the computer or computers on your network with their IP address to shutdown, restart, log off  and set the display warning time in seconds and comment you want to give when shutdown warning message appears.
3. Press OK button

Download LanShutDown
Tagged under: , ,

Remote Shutdown

You will need to have admin access to the PC to perform these actions. That being said, here is the first way to do it:
Right click my computer, choose manage.
Highlight the Computer Management (Local) then click on Action, choose connect to another computer.
In the window that opens fill in the machine name of the PC you want to connect to and click ok.
Once connected right click on Computer Management (Remote machine name) and choose properties.
Go to the “Advanced” tab and click the Settings button under Start up and recovery.
Click on the Shutdown button.
Under action choose what you want to do (you can log off current user, shut down, restart, or power down. you can also choose if you want to force all applications to close, close hung apps, or wait for all apps to close by themselves).
The second way… Remember dos… that good old thing. Open up a command prompt and enter in the following:
%windir%\System32\shutdown.exe -r -m \\Machinename. The command prompt has more switches and options. I highly suggest using shutdown.exe /?  to see all the possibilities.
Tagged under: ,

SoftPerfect Network Scanner 4.4

The Ping command is one of the most commonly used utilities on the Internet by people for conducting the most basic network test: can your computer reach another computer on the network, and if so how long does it take? It sends request to networked computer and waits for response. It’s easy to ping single PC but not so in the case  when you  ping dozens  or hundreds of them.Network scanners are the same ping command deep inside, which  are equipped with graphical interface made for targeting and displaying responses of multiply computers in one sweep.
SoftPerfect Network Scanner is a free multi-threaded IP, NetBIOS and SNMP scanner with a modern interface and several advanced features. It is intended for both system administrators and general users interested in computer security. The program pings computers, scans for listening TCP ports and displays which types of resources are shared on the network (including system and hidden).
In addition, it allows you to mount shared folders as network drives, browse them using Windows Explorer, filter the results list and more. SoftPerfect Network Scanner can also check for a user-defined port and report back if one is open. It can also resolve host names and auto-detect your local and external IP range. It supports remote shutdown and Wake-On-LAN

Features
  • Pings computers.
  • Does not require administrative privileges.
  • Detects hardware (MAC) addresses even across routers.
  • Detects hidden shared folders (normally invisible on the network) and write accessible shares.
  • Detects your internal and external IP addresses.
  • Scans for listening TCP ports and SNMP services.
  • Retrieves currently logged-on users.
  • You can mount and explore network resources.
  • Can launch external third party applications.
  • Exports results to HTML, XML, CSV and TXT
  • Supports Wake-On-LAN, remote shutdown and sending network messages.
  • Retrieves potentially any information via WMI.
  • Retrieves information from remote registry.
  • It is absolutely free, requires no installation, and does not contain any adware/spyware/malware.   Download |Windows 98/ME, NT, 2000, XP, 2003, Vista, 2008|704KB|Freeware
  • Tagged under: ,

    Free Unlimited VPN client connection

    Hey, Here for you  free VPN client connections to USA. This is very useful incase if your network blocked for browsing any websites or software access... It’s really  good rather than using any kind of third party application like Hotspotshield, u94, Tor proxy etc.. you don't have to worried about any software installation, just use as windows VPN client.

    Free VPN server Address

    • freevpn1.homeunix.com
    • freevpn2.homeunix.com
    • freevpn11.homeunix.com
    • speedprooxii.rr.nu

    Username and password

    • Username: fora2  Password: freevpn2480
    • Username : fora1 Password : freevpn124

    Free Unlimited VPN client configuration in Windows Visa

    • Go to Network and Sharing Center.
    • Click Setup a connection or network (right side on the page)

    • You have to choose Connect to a Workplace and then click Next
     
    • Choose Use my Internet connection (VPN)

    • You have to enter address of the VPN server (Provide any one of the above address, like speedprooxii.rr.nu) and VPN Connection name. then click next.

    • Provide the username and password (like fora2 and password freevpn2480). then pres connect.

    Try to connect any website which were blocked in your network by the ISP...and enjoy!!!

    For VPN client configuration in Windows XP, Please visit my previous post

    Tagged under: , , ,

    Create a wireless hotspot using your laptop


    Have you  reached a place where there is no Wi-Fi hotspots?Even if hotspots are available ,you may not be able to access it because of secured connection.A call to a nearby service provider  may not work even. Don’t worry,you can turn your Laptop into a local hotspot with some simple steps.

    If you have an access to a wired broadband connection and if your Laptop have the Ethernet support you can easily setup a wireless hotspot.This trick works fine,but just some times the DHCP can mess up. Its just bridging the connections and making an ad hoc network with forwarded net.


    Here are the steps to implement your own hotspot in no time:

    In Windows Vista:

    1)Connect the laptop to the internet using the Ethernet cable.
    2}Open the control panel and go into the Network and Sharing Center.
    3)Set up a new connection called a wireless ad hoc network.
    4)Give it a name and setup the desired security options.
    5)Deselect Save this Network.
    6)Finally, click on Turn on Internet Connection Sharing.
    7)Now anyone can connect to your laptop’s Wi-Fi.

    In Windows XP:

    1)Make sure your laptop is connected to the Internet using the Ethernet cable.
    2)Go to Control Panel and open up Network Connections.
    3)Right-click on your wireless connection and select Properties.
    4)On the Wireless Networks tab, check Use Windows to configure my wireless network setting.
    5)Under Preferred networks, click Add, and name your network.
    6)Select shared, and provide a password.
    7)Click the Advanced button and select Computer-to-Computer (ad hoc) networks only.
    8)Go back to the Network Connections control panel and open the Properties dialog for your wired internet connection.
    9)Go to the Advanced menu and check the box next to Allow other network users to connect through this computer’s internet connection.