300x250 AD TOP

Showing posts with label Information. Show all posts

Saturday, 17 March 2012

Tagged under:

Send to One Note Printer for Windows 64 bit

XPS2OneNote - Print to OneNote 2007 on 64 bit Vista or Windows 7 OS

  • Fixes issues the previous release had on Windows 7 64 bit
  • Option to print to a single OneNote page, or separate OneNote pages
  • Option to scale the printout from the printout dialog
  • Can select the destination section to print to (same as previous release)
  • You should uninstall the previous version first. You will need to restart your machine, or manually start XPS2OneNote after installation.
  • Note: this works differently to the Send to OneNote 2007 print driver. Please read the instructions below on how to use it.
This works for 32 bit OSes as well, but it's pirmarily intended to help those who cannot print to OneNote 2007 because the Send to OneNote 2007 print driver does not support 64 bit. If you're on a 32 bit OS you don't need this, but may appreciate the ability to scale print outs, print to separate pages and choose the destination section. Also note that OneNote 2010 (currently in beta) fully supports Send to OneNote 2010 print driver on 64 bit OSes so this is not necessary if you have OneNote 2010.

1. Installation

To install XPS2OneNote download and run the XPS2OneNote setup.
Note: you should uninstall the previous release first, also you will need to restart your machine or manually start XPS2OneNote after install.

2. Using XPS2OneNote

Overview of how XPS2OneNote works
XPS2OneNote should be simple to use and as easy as the Send to OneNote 2007 print driver included with OneNote but it works a little differently.

  • XPS2OneNote runs on startup and runs in the background, sitting in the system tray.
  • XPS2OneNote creates a "drop folder" on your desktop called "XPS Print to OneNote Drop Folder"
  • XPS2OneNote watches this folder for any .xps files that are added to it.
  • You print from your application using the "Microsoft XPS Document Writer" print driver, saving into this folder. The "Microsoft XPS Document Writer" comes with Vista and supports 64 bit.
  • XPS2OneNote notices the file and inserts it as a printout into OneNote. It prompts you for the section you want it sent to.
  • XPS2OneNote then removes the file from the drop folder and cleans up.

Detailed steps

Notification tray icon
XPS2OneNote will start whenever Windows starts. When it is running you will see it in the system notification tray. If you right click on it you can exit it, or change the settings. Generally you shouldn't need to touch this.
2-NotificationTrayIcon.png

Printing: 1. Choose the XPS print driver
To print using XPS2OneNote just print from your application and choose the "Microsoft XPS Document Writer" in the print dialog then click OK to print.
1-Print Dialog.png

Printing: 2. Save the printout to the XPS2OneNote drop folder on your desktop
A save dialog will pop up. Using the folder tree on the left or the folder path at the top of the dialog navigate into the "XPS Print to OneNote Drop Folder" folder on your desktop. Then in the file name field at the bottom of this dialog type a name for the XPS file.
Note: you should only have to navigate to the drop folder on first use. The XPS print driver will remember this as the default location after this.
Note2: The file name you choose will be used as part of the page name in OneNote, but you can always edit this later in OneNote.
4-FileDialog.png

Printing: 3. Choose the destination section
Next the following dialog will come up (sorry, not very pretty is it...) asking which of your OneNote sections you'd like the print out sent to. Choose one and click "Insert Printout in OneNote".
5-ChooseSectionDialog.png

Printing: Success
You will see a progress message (if the printout is short it will be very quick) and then a success message like the one below will indicate it is complete. In OneNote you will see your printout in the chosen OneNote section with one print out page per OneNote page. You're done!
6-SuccessMessage.png

Settings
In the settings dialog you can change the scaling of the pictures to something other than 100% if you want it to fit on a smaller page or blow it up larger. 
You can also specify a different drop folder path (but don't need to), and if you're using a DPI other than the typical 96dpi then you can change that setting which will help make the print outs map pixel to pixel and avoid blurry scaling. Don't change this unless you know you're using a different DPI on your screen.
3-Settings.png

3. Known limitations

First caveat, this is not Microsoft supported software. The initial implementation was created in my personal time during a little rare free time during vacations and weekends. It is an open source CodePlex community project, and hopefully others can contribute. Having said that, I took a lot of short cuts and used an expedient approach to this. It is not how it would be done in a shipping product. It's likely that it will not handle error cases well (like trying multiple printouts at once, or deleting files while it's using them). In such cases it may just crash. On the plus side, a crash should be benign. It should just shut down XPS2OneNote and restarting it should be fine, and under most usage it should work fine.

4. Feedback and contributions

Please provide feedback specific to the implementation on the discussions tab (you'll need to be logged on). You can also send me general feedback at my blog. 

Once I get the source code cleaned up and posted, you may directly contribute to it and improve it. 

Project Description
XPS2OneNote enables printing documents to OneNote for 64bit operating systems such as Vista x64, which is not supported by the "Send to OneNote" print driver. It also enables scaling the printout size. It is written in C# and uses the XPS print driver. 

Tagged under:

Ultrabooks in Pictures: The Newest, Thinnest, Lightest Laptops


Ultrabooks, a term coined by Intel, give name to the increasingly thin, light, fast and (relatively) cheap Windows laptops popping up over the last year in reaction to the Apple MacBook Air and the iPad-led tablet craze.

Ultrabooks Have Arrived
The iPad and other tablets are slowly but surely replacing laptops in many homes and offices. But there's a new category in town to keep the laptop from going extinct: the ultrabook. Having made a big splash at CES 2012, ultrabooks refer to thin and light Windows 7 laptops with guidelines set by Intel (roughly 1-inch thick, 3 lbs,13-inch screen, solid-state drives, for $1,000 or under).
Here's a look at 10 of the best ultrabooks, all of which will be able to run Windows 8 when launched this fall.


Apple MacBook Air
Apple's MacBook Air is not an ultrabook per se, but it was the first mainstream laptop to go ultra-thin and light. It stirred up the market and forced Intel and Windows OEMs to design machines that are lighter, thinner, faster and cheaper. Here are the MacBook Air specs.
• 13.3-inch display (cheaper 11.6-inch model also available)
• 1.7GHz dual-core Intel Core i5 with 3MB shared L3 cache
• 4GB of 1333MHz DDR3 memory
• 128GB flash storage or 256GB flash storage
• 7 hours of battery life
• Mac OS X Lion
• 0.68 inches thick
• 2.96 lbs.
• $1299 (128GB flash storage), $1599 (256GB flash storage)

Samsung Series 5
Samsung's ground-breaking Series 9 ultra-thin laptop is too expensive to be considered a true ultrabook, but its Series 5 machine fits the bill. The sleek aluminum Series 5 machine comes in two sizes: 13-inch and 14-inch displays, with the main difference being that the 14-inch contains a DVD drive and is slightly thicker, heavier and more expensive.
• 13.3-inch and 14-inch display
• Intel Core i5-2467M Processor
• 4GB DDR3 memory
• 500GB hard drive capacity, with 16GB solid-state cache
• 6.5 hours of battery life
• Windows 7 Home Premium (64-bit)
• 0.69 inches thick (13-inch), 0.82 inches thick (14-inch)
• 3.24 lbs. (13-inch), 3.94 lbs. (14-inch)
• $899 (13-inch), $949 (14-inch), $1099 (13-inch model with 128GB solid-state drive)


Toshiba Portege z835
Toshiba's Portege z835 is the lightest ultrabook on the market at 2.4 lbs., with standout features such as a back-lit, spill-resistant keyboard, faster boot times than most ultrabooks and seven hours of battery life. Price is right, too.
• 13.3-inch display
• 1.4-GHz Intel Core i3-2367M
• 4GB of RAM
• 128GB SSD Drive
• 7 hours of battery life
• Windows 7 Home Premium (64-bit)
• 0.3 - 0.6 inches thick
• 2.4 lbs.
• $899


HP Envy 14 Spectre
At $1,400, the HP Envy 14 Spectre is technically too expensive to be an ultrabook (heck, it's more expensive than the MacBook Air!), but it delivers a lot for that price, including a (truly durable) Gorilla Glass design, a carrying case, nine hours of battery life and a two-year subscription to Norton Internet Security.
• 14-inch display
• Intel Core i5-2467M
• 4GB of DDR3 (expandable to 8GB)
• 128GB SSD Drive (expandable to 256GB)
• 9 hours of battery life
• Windows 7 Home Premium (64-bit)
• 0.79 inches thick
• 3.79 lbs.
• $1,400, $1,899 (with 8GB RAM and 256GD SSD)


Lenovo IdeaPad U300S
The ultra-slim, book-shaped Lenovo IdeaPad U300S comes in eye-catching colors such as graphite gray and clementine orange and delivers most of the goods for a reasonable (though higher than most ultrabooks) price of $1,095. A souped-up model with more storage and a faster processor is available for $1,495.
• 13.3-inch display
• 1.6GHz Core i5-2457M
• 4GB of RAM
• 128GB SSD Drive
• 6-7 hours of battery life
• Windows 7 Home Premium (64-bit)
• 0.6 inches thick
• 2.9 lbs.
• $1,095 (a higher-end model with a Core i7 CPU and 256GB SSD is available for $1,495)


Asus Zenbook UX31
The Asus Zenbook was the first "ultrabook" on the market and has stood up as the closest thing to a "MacBook Air killer." The Zenbook has very similar specs to the MacBook Air, but for $250 less. It is also just as sleek in appearance with a smooth aluminum lid and all-metal chassis, high-resolution display and audio provided by Bang & Olufsen.
• 13.3-inch display
• Intel Core i5-2467M
• 4GB of RAM
• 256GB SSD Drive
• 7 hours of battery life
• Windows 7 Home Premium (64-bit)
• 0.67 inches thick
• 2.86 lbs.
• $1,049


Dell XPS 13
The Dell XPS 13 ultrabook sports a bright edge-to-edge Gorilla Glass screen, a backlit keyboard and a beautiful aluminum exterior. Despite skimping on ports -- No Ethernet, HDMI, VGA or memory card slots -- Dell's foray into ultrabooks is a solid contender.
• 13.3-inch display
• Intel Core i5-2467M processor
• 4GB of RAM
• 128GB SSD Drive
• 6 hours of battery life
• Windows 7 Home Premium (64-bit)
• 0.7 inches thick
• 3 lbs.
• $999


Acer Aspire S3
The Acer Aspire S3 is one of the thinnest ultrabooks, but if design is your thing you might be let down because this one is mostly plastic (with a magnesium lid). However, the Aspire S3 is super-thin with a sweet price of $899. You'll also get more storage with its 320GB hard drive; the addition of 20GB of flash memory will speed up boot times.
• 13.3-inch display
• 1.6 GHz Intel Core i5-2467M processor
• 4GB of RAM
• 320GB hard drive, with 20GB of flash memory
• 6 hours of battery life
• Windows 7 Home Premium (64-bit)
• 0.51 inches thick
• 2.9 lbs.
• $899


HP Folio 13
At 3.3 pounds, the sturdy HP Folio 13 is a tad heavy for an ultrabook. But the tradeoff is that the bulk gives you more ports (USB 3.0 ports, HDMI, Ethernet, memory card slot) than most ultrabooks and also killer battery life -- nine hours, according to HP. The brush metal lid and soft finish on bottom is elegant and easy on the eyes.
• 13.3-inch display
• Intel Core i5-2467M processor
• 4GB of RAM
• 128GB SSD Drive
• Up to 9 hours of battery life
• Windows 7 Home Premium (64-bit)
• 0.7 inches thick
• 3.3 lbs.
• $899
Lenovo IdeaPad Yoga
The Lenovo IdeaPad Yoga is an ultrabook/tablet hybrid. Its display can be flipped around and bent over backward to become a tablet, potentially giving users the best of both worlds, a thin notebook a la the MacBook Air converted to a touch-enabled tablet a la the iPad, though with more heft and a bigger screen (13.3 inches). If any device is ideal for the upcoming Windows 8 release, Yoga is the one. It will be available in the second half of 2012.
• 13.3-inch display
• Latest Intel Core processor
• 8GB of RAM
• 256GB SSD Drive
• 8 hours of battery life
• Windows 8
• 0.67 inches thick
• 3.1 lbs.
• $1,199 -- estimated retail price
Thanks:NetworkWorld.com

Tuesday, 6 March 2012

Tagged under: ,

Create an intelligent XML image Gallery & Slideshow in Flash CS4 (+PHP) – Part II/II


Create an intelligent XML image Gallery & Slideshow in Flash CS4 (+PHP) – Part I/II

Here is the first part: Create an intelligent XML image Gallery & Slideshow in Flash CS4 (+PHP) – Part I/II

Create an intelligent XML image Gallery & Slideshow in Flash CS4 (+PHP) – Part II/II

In the second part you will transform your gallery made on the first part of this two-part tutorial into a gallery with some polaroid distributed thumbnails. You will also learn how to auto-create those thumbs in php, load them randomly into flash and use the same animation style to show the gallery.
We will add also a simple button to swap from thumbnails gallery (part two) to slideshow (part one).
First let’s take a look to this second part final result.

Final Result:

http://www.thetechlabs.com/wp-content/uploads/2010/11/gallery.swf
This gallery will have some cool final result features, let’s take a brief look:
  • Auto-find images in folder (works with PNG, JPEG, JPG)
  • Write an XML file automatically
  • Can work only with an XML file and without php
  • Have a full screen option
  • Fits automatically the screen center
  • Can customize the speed of slideshow
  • Automatically generate thumbnails of images in folder *
  • Spread the thumbnails automatically on the screen *
  • Make the slideshow static (only opens in thumbnail click) *
This tutorial is be divided into two parts, the first one is available here.
Download Source Files

Requirements


  • Have Flash CS4.
  • An amp server (or similar like wampserver), any online hosting with php support works to.
  • The TweenLite engine that you can download here.
  • The first part of this tutorial, that can be downloaded here.
  • The open source thumb creation class available here. Can be downloaded directly here.
  • Have this polaroid image to add a better look and feel to our loaded thumb.

Pre Requirements


  • Know a little of PHP.
  • Understand the concept of constraint layout in flash (auto position content).
  • A good knowledge of Flash, especially Action Script 3.


Getting started


It’s highly recommended that you go through the first part of tutorial first. Explore the code a little and understand the php part of it. A good knowledge of constraint layouts is a must.
This second part is easier to follow and achieve than the first part, but pay attention to all steps, they are most of them in action script code, so I recommend that you write them and not copy. This is great to practice. Remember; Write instead Copy & Paste!


Step 1 – Updating PHP files


All the php files are supposed to be in the c:/www/wamp folder, so we will continue with this. Grab the thumbnail files (the class.files.php and class.thumbs.php) form this archive and put them on the previously created folder called gallery. Then just open the imageHandler.php file, find the ary2xml() function and inside it, got to the line:
$data.="<image nameI="".$arr[$h]."" thumb="".$arr[$h]."" />rn";
and replace it by this one:
$data.="<image nameI="".$arr[$h]."" thumb="thumbs/".$arr[$h]."" />rn";
This will update your gallery thumbnails path to the folder thumbs so the flash searches this folder for thumbnails. This will do nothing for now because the main thumbnail generation job will be made by those two files we had added on the folder. Just save the file.

Step 2 – Creating the thumbnails with PHP

This step is quite easy because those two classes are ready to use. Just open your discover.php file and do the following changes:
Add this line after the <?php to call your thumb generation class:
include_once("class.thumbs.php");
and before this:
print_r($tm->ary2xml($data,0,'',"images.xml"));
add these two lines:
$thumbs = new thumbs("./", 0, "thumbs/", false, 0, 100, false, 125, 125);

  $thumbs->creates_thumbs();
And that’s all! This will create thumbnails with 125x125px in the thumbs folder with the same image name. Our thumbs are ready to use. Save the file and open the previous flash project.

Step 3 – Creating a polaroid thumbnail

With your flash project open, just go to menu Insert->New Symbol and create a movieClip with polaroidMC name and export it to action script, like this: (please note that my ui language is French, but should be easy to understand when you have this window on flash)
1
This will create a movieClip that can be loaded from action script to create multiple instances of it. Is the fast way to duplicate items on stage. All the regular MovieClip properties will be available in this movieClip also.
Now, just import into stage our polaroid.png image and center in on stage. File->Import->Import into stage and select our polaroid image. Make it similar to this:
1
Then we just need to put a text input into the bottom part to display the image name and a empty and masked movieclip to load the thumb picture. This is quite easy, create 3 more layers over the existing one, name the first one Text, the second Image Loader and the third Mask.
Now, on the first one draw a text field, center the text and make the field with +- the same with of the image. Then , on the Image Loader draw a rectangle with the same area than the blue part of the polaroid image, something like this:
1
Now Right Click on it, and convert it into a movieClip Symbol… name this instance img. Name the text Field instance to “lbl” and now just create another rectangle with the same area of the one in black but do draw it on the Mask layer.
Now, just mask that layer: Right Click-> Mask.
Our Thumbnail loader is created and ready to load our picture.

Step 4 – Make changes on the trigger command

Go to our main stage, on the first frame actions and open actions panel. On this panel we need to make some changes to our movie.
The first thing to have in mind is that we will load our movieclip with all the thumbnails distributed over the screen area, and we will also have a button to play a slide show with those pictures. This is already made, so we need only to create a button to load the slide show, and on the very first start it will be stopped. So, for that we will add a variable called SLIDE_ON to control the slide state. Just add this on the top of the script declarations:
var SLIDE_ON:Boolean=false;

var THUMBS_HIDDEN=false;
The we need to avoid slid to start, just go to the function onXmlComplete() and replace this:
onTime(new TimerEvent(TimerEvent.TIMER)); //load first;
with this:
if(SLIDE_ON) onTime(new TimerEvent(TimerEvent.TIMER)); //load first;
This will stop slide from loading, but the lines and the loader will appear, we just want them to disappear, for that just do this function:

Step 5 – Code a function to hide/stop the slide

 function hideSlide():void {
 LT.alpha=0;
 LB.alpha=0;
 preloader.alpha=0;
}
and call it on the onXmlComplete function on the else instruction, making it appear like this:
function onXmlComplete(evt:Event):void {
 IMAGES = xml2Array(evt.target.data); //load images into array
 if(SLIDE_ON) onTime(new TimerEvent(TimerEvent.TIMER)); //load first;
 else hideSlide();
 }

Step 6 – Create a button to switch between slide/thumbnails presentation

Now the slide is ready to load our pictures into the thumbs and spread the randomly overt the screen, but first lets create a start/stop slide button. Grab this archive and extract those two pictures some place, then in flash create a new MovieClip name it slideControl and the import those two extracted images to stage: File-> Import -> Import to stage. Create two frames and on the first frame put the “screen” image and on the second one the “folder/thumbs” image. Make sure they are placed on the exactly same position: x=0 and y=0. On the first layer actions write down
stop();
Now, just go back to stage, double click on the galControls movieClip and then just drop from the library our recently created slideControl movie clip. Put it on the left aligned with the existing ones.
1
Name it’s instance as btnSlide and go back to main stage. The in the actions write this down on bottom of the existing code:

Step 7 – Code the slide switch button actions

galControls.btnSlide.buttonMode=true;
galControls.btnSlide.useHandCursor=true;
galControls.btnSlide.addEventListener(MouseEvent.CLICK, switchSlide);
After this we will need to create this switchSlide function but not for now…

Step 8 – Creating the thumb loader function

Now, we need to create a function to load all our thumbnails and spread them over the screen, just create these functions:
  var thumb:polaroidMC;
      var thumbLoader:Loader;function loadThumbs():void {
      //let's define stage container size to distribute thumbs
     for(var h:int=0; h<IMAGES.length; h++) {

      thumb=new polaroidMC();
      thumb.lbl.text=IMAGES[h].imageName;
      thumb.x=-70;
      thumb.y=stage.stageHeight+100;
      thumb.name="thumb-"+IMAGES[h].imageName;
      thumb.id=IMAGES[h].imageName; thumbLoader=new Loader();
      thumbLoader.x=0;
      thumbLoader.y=0;

      thumb.img.addChild(thumbLoader);

      thumbLoader.name="loader-"+h;

      addChild(thumb);

      thumbLoader.contentLoaderInfo.addEventListener(Event.COMPLETE, onThumbDone);
      var link:String=HOST+IMAGES[h].imageThumb;
      thumbLoader.load(new URLRequest(link));

      loadEvents(thumb, true);

      /*****************************************************/
      //var tmb:polaroidMC = (evt.target as polaroidMC);
      var max_x:Number=stage.stageWidth-70;
      var max_y:Number=stage.stageHeight-70;
      var min_x=0;
      var min_y=0; var rndX:Number=Math.ceil(Math.random() * (max_x - 0 + 1)) + (0 - 1);
      var rndY:Number=Math.ceil(Math.random() * (max_y - 0 + 1)) + (0 - 1);
   var rot:Number=Math.ceil(Math.random() * (45 - 0 + 1)) + (0 - 1)
      thumb.rotation=rot;

      TweenLite.to(thumb,1,{x:rndX, y:rndY});

      }
      }
This function will load all thumbs as polaroidMC’s, and add them a Loader as child to load the thumbnail image.

Step 9 – The thumb load complete event

When the thumb image is finished downloading, just open it and spread it over the screen:
function onThumbDone(evt:Event):void {
   var tmb:polaroidMC = (evt.target as polaroidMC);
   var max_x:Number=stage.stageWidth;
   var max_y:Number=stage.stageHeight;
   var min_x=0;
   var min_y=0;
  var rndX:Number=Math.ceil(Math.random() * (max_x - 0 + 1)) + (0 - 1);
   var rndY:Number=Math.ceil(Math.random() * (max_y - 0 + 1)) + (0 - 1);

  TweenLite.to(tmb,1,{x:rndX, y:rndY});
   }

Step 10 – Thumb Mouse Interaction Switcher

It calls also a function to load the events on it. It will act as a switcher allowing to load/unload these properties on each polaroidMC:
function loadEvents(mc:polaroidMC, opt:Boolean):void {
 if(opt==true) {
 mc.buttonMode=true;
 mc.useHandCursor=true;
 mc.addEventListener(MouseEvent.MOUSE_OVER, onThumbOver);
 mc.addEventListener(MouseEvent.MOUSE_OUT, onThumbOut);
 mc.addEventListener(MouseEvent.CLICK, onThumbClick);
 }
 else {
 mc.buttonMode=false;
 mc.useHandCursor=false;
 mc.removeEventListener(MouseEvent.MOUSE_OVER, onThumbOver);
 mc.removeEventListener(MouseEvent.MOUSE_OUT, onThumbOut);
 mc.removeEventListener(MouseEvent.CLICK, onThumbClick);
 }
 }

Step 11 – The thumb event handlers

Now we need to create the events for the thumbs, just add some fade in/out effects and call the image to open when thumb is clicked:
function onThumbOver(evt:MouseEvent):void {
   (evt.currentTarget as polaroidMC).alpha=0.75;
   }
   function onThumbOut(evt:MouseEvent):void {
   (evt.currentTarget as polaroidMC).alpha=1;
   }
When a user click on the thumb we will hide all the existing thumbs and make the animation to load the selected image:
function onThumbClick(evt:MouseEvent):void {
   hideThumbs(loadImage, HOST+"/"+(evt.currentTarget as polaroidMC).id);
   ldr.addEventListener(MouseEvent.CLICK, onLDRClick);
   }

Step 12 – The hide thumbs function

For hide the thumbs we will code this that will search for all the stage child this the thumb name and hide them:
function hideThumbs(onComplete:Function=null, arg:String=null):void {
   for(var g:int=0; g<numChildren; g++) {
 if(getChildAt(g).name.toString().indexOf("thumb-")>-1)  {
 TweenLite.to(getChildAt(g),1,{alpha:0, onComplete:hiden, onCompleteParams:[getChildAt(g)] });
 loadEvents((getChildAt(g) as polaroidMC), false);
 }
 }
 THUMBS_HIDDEN=true;
 if(onComplete!=null && arg!=null) onComplete(arg);
 else if(onComplete!=null) onComplete();
 }
This function is a little special, it will receive as argument a new function and it’s function arguments, meaning the is possible to call any specific function that we can input to act as a onComplete function, this is very useful cause after all the thumbs are hidden we need to open the selected image.
The function acts like this:
Find all the stage children’s that have on it’s name the “thumb” word, then Tween them alpha=0; then call the function loadEvents() that will unload the thumb mouse interaction and on the end of this tween call the function provided by the function arguments.
function hiden(mc:polaroidMC):void {
   mc.visible=false;
   }
We need this function also to make visible=false all the thumbs because if they have only the alpha=0; they will still clickable and we do not want this.

Step 13 – The show thumbs function

We need also to create a function to show our thumbs again when the loader is licked and the displayed picture closed, write this down:
function showThumbs():void {
 trace("showing thumbs");
 for(var g:int=0; g<numChildren; g++) {
 if(getChildAt(g).name.toString().indexOf("thumb-")>-1 && getChildAt(g).visible==false )  {
 TweenLite.to(getChildAt(g),1,{alpha:1});
 getChildAt(g).visible=true;
 loadEvents((getChildAt(g) as polaroidMC), true);
 }
 }
 THUMBS_HIDDEN=false;
 }

Step 14 – The loader click handler

This is the listener of loader clicks (when user click on the main photo loaded the image will close and the thumbs will appear again):
function onLDRClick(evt:MouseEvent):void {
 resetLines();
 ldr.removeEventListener(MouseEvent.CLICK, onLDRClick);
 preloader.visible=false;
 LT.alpha=0;
 LB.alpha=0;
 IMAGE_LOADED=false;
  }

Step 15 – The slide Switcher

Well it’s almost done, just need to create a function to switch to slide mode:
function switchSlide(evt:MouseEvent=null):void {
 if(SLIDE_ON==false) {
 hideThumbs();
 SLIDE_ON=true;
 LT.visible=true;
 LB.visible=true;
 preloader.visible=true;
 LT.alpha=1;
 LB.alpha=1;
 preloader.alpha=1;

 timex.start();
 galControls.btnSlide.gotoAndStop(2);
 }
 else {
 SLIDE_ON=false;
 timex.stop();
 resetLines();
 LT.alpha=0;
 LB.alpha=0;
 preloader.alpha=0;
 preloader.visible=false;
 //preloader.alpha=0;
 galControls.btnSlide.gotoAndStop(1);
 }
   }
function swapThumbs(evt:MouseEvent):void {
 if(THUMBS_HIDDEN==true) showThumbs();
 else hideThumbs();
 }

Step 16 – Replacing thumbs on screen resize

And it’s almost done, just need to create a function to reload all the thumbs into new screen positions when the user switch’s to full screen. Write this function down:
function reloadPos():void {
 for(var g:int=0; g<numChildren; g++) {
 if(getChildAt(g).name.toString().indexOf("thumb-")>-1)  {
 getChildAt(g).x=stage.stageWidth+150;
 getChildAt(g).y=stage.stageHeight+150;

 var max_x:Number=stage.stageWidth-70;
 var max_y:Number=stage.stageHeight-70;
 var min_x=0;
 var min_y=0;
 var rndX:Number=Math.ceil(Math.random() * (max_x - 0 + 1)) + (0 - 1);
   var rndY:Number=Math.ceil(Math.random() * (max_y - 0 + 1)) + (0 - 1);
   var rot:Number=Math.ceil(Math.random() * (45 - 0 + 1)) + (0 - 1)
   getChildAt(g).alpha=1;
   if(IMAGE_LOADED==false) getChildAt(g).visible=true;

   getChildAt(g).rotation=rot;

   TweenLite.to(getChildAt(g),1,{x:rndX, y:rndY});

   loadEvents((getChildAt(g) as polaroidMC), true);
   }
   }
   }
A function to reload thumbs position, this will be called on screen resize.
function replaceThumbs():void {
   hideThumbs(reloadPos);
   }

Step 17 – Updating the code

Now just need to make some minor changes to the part I tutorial code;
On the onXmlComplete() function write on bottom:
loadThumbs();
then on function resetLines() replace the bottom line :
 else TweenLite.to(preloader, 1, {alpha:1});
with this one:
 else TweenLite.to(preloader, 1, {alpha:1, onComplete:showThumbs});
On the reloadLines() function, write on bottom:
 if(SLIDE_ON==false) replaceThumbs();
On the animateToImage() function just replace the
timex.start()
with
if(SLIDE_ON==true) timex.start();
And finally on the onImageComplete() function, find the lines:
if(FIRST_RUN==true) { //if is the first run
 timex.start(); //if it's first run, activate the timer to load next images.
 FIRST_RUN=false; //now it's not the first run
 }
And replace them with
if(FIRST_RUN==true) { //if is the first run
   if(SLIDE_ON==true) timex.start(); //if it's first run, activate the timer to load next images.
   FIRST_RUN=false; //now it's not the first run
   }
This will avoid loading slideshow on first movie run.
Well, that’s all… save your project and run it! Nice ha?
So, I hope you liked this tutorial! Don’t forget to comment, subscribe to our RSS feed and follow us on Twitter. If you have any doubts, just sign up on our forum and ask for help.
Tagged under:

Beginners Guide To User Interface Design in C#

User Interface Design in C# Windows Form Application From Scratch

In this C Sharp tutorial you will learn user interface design in C# application. This step-by-step tutorial will help you deeply understand the basic building concept of user interface design in C# application. You will learn to use different types of GUI controls in C# Windows form-based application.

Requirements For User Interface Design in C#

Visual Studio 2010

Pre-Requisites

You must be familiar with the basic syntax of C# language. Here are the steps. I have also uploaded the screenshots for your better understanding.

Step 1: Choose New Project in Visual Studio

Open Visual Studio 2010. Click on New Project. Choose the project category “C# Windows Form Application”. At the bottom you can rename your application. As you can see I have renamed it to “techlab_userinterface”. Then click Ok.
User Interface Design

Step2: Changing The Form Name

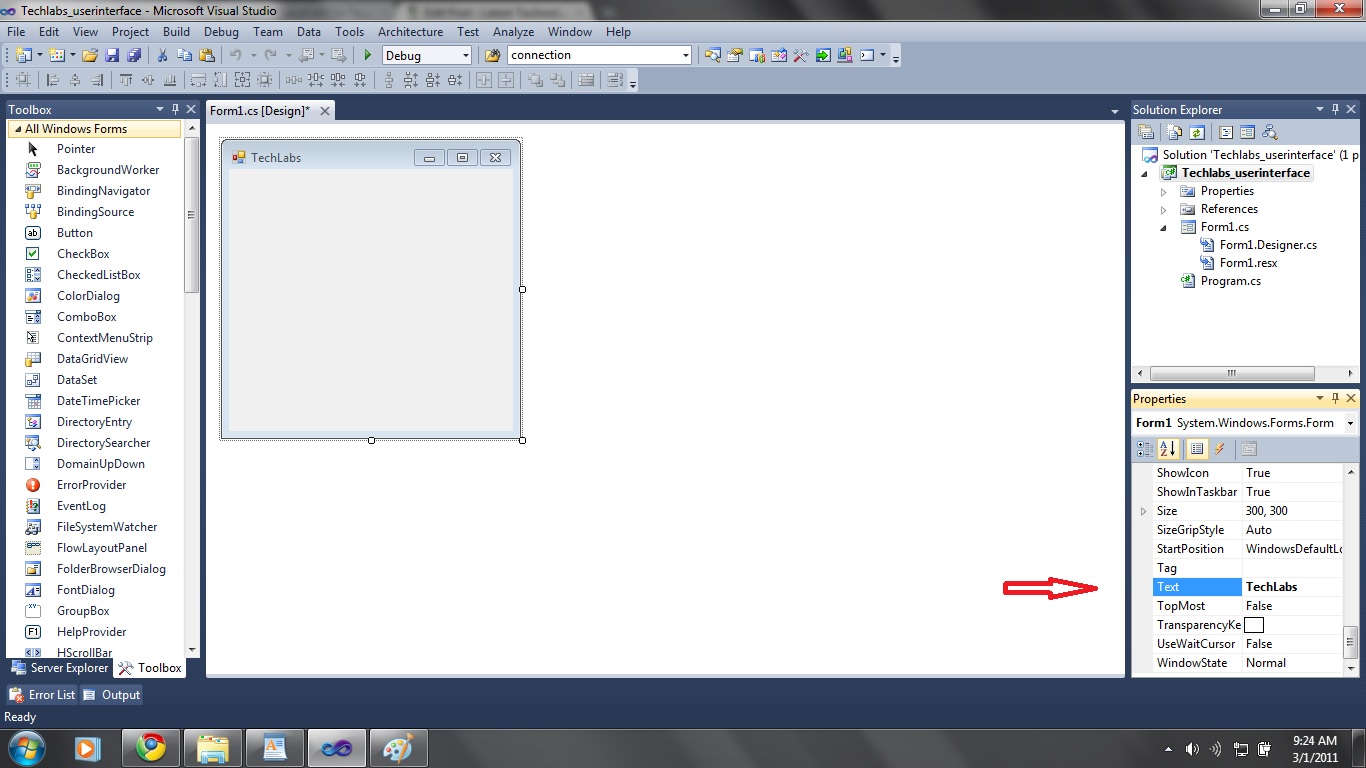
After clicking Ok, you will see a blank form. First of all if you want to change your Form Name, go to the properties window and Find “Text“. Change it to what ever you want. I changed it to “TechLabs“. On Left Side you will see the Toolbars windows. Today we will learn to use some of these basic controls. If you are not viewing these toolbars then you can enable them from View->Toolbox.

Changing Form Name

Step 3: Dragging Controls On The Form

Now we will start dragging Controls from the toolbox window. I have dragged two text boxes, two labels and one button. Rename all of these by simply selecting control on form and changing Text in the properties window as shown in this screenshot.
Dragging controls

Step 4: Adding Password Property To Text Box

Now we are designing a Login Form. We all know that when ever we type our password to some Login window then it appears as dots. We will also add this option to our lower text box. Here we go. Simply select the lower text box. Then go to the properties window and Find “Password Char”. Fill it with the desired character. I filled it with “*”. Now when you will enter password, stars will appear.
Password property

Step 5: Writing C# Code Behind Button

Now let’s start the core of the process. Double click the Login button. Here we will write some piece of code. For example I want to authenticate a user on entering:
Username= techlabs
Password= techlabsrox
Then I will write the following code.
In the above code, in first line I am comparing it with the username and password. If it is correct a pop up will appear that you have entered the correct details. Otherwise you will see an error message and both text boxes will be clear.

Resulting User Interface Design in C#

User Interface in C#
So this was a C Sharp tutorial for beginners on login user interface design in C#. In the upcoming tutorials we will learn to use other controls which will help you to design more interactive user interface in c#.


Tagged under:

First Look: Opera 11 vs. Chrome 10

Opera today released a new version of its browser, which arrives with less features than originally promised. We especially miss hardware acceleration, which, however, will most likely be worth the wait when it will be added later on. We had the chance to take Opera 11 through our four standard JavaScript  benchmarks on our two hardware platforms to see if there was any performance improvement and what new features you can expect.
opera logo
Opera built considerable expectations when it announced Opera 11 a few weeks ago. Of course, there was a good reason for beating the PR drums. For the first time I can remember, Opera is falling behind in the browser speed race, not just behind Chrome, but also behind IE9 and Firefox. Some trendy features like hardware acceleration are missing (even if Opera has arguably the most advanced software acceleration backend in browsers today) and that just does not sit too well with users in a time when they are willing to switch their browsers almost on a daily basis and use certain browsers for very specific tasks.
The stakes are high in this cut-throat market, in which innovation speed counts. We had a first look at the final version and prepped a JavaScript test run on our 6-core Phenom II X6 PC as well as our new Gateway NV95C notebook with a dual-core i3-300M CPU. We benchmarked it against the latest Chromium nightly build, version 10.0.614.0, which includes an improved Crankshaft and is the fastest JavaScript browser you can use today. So it’s not a fair comparison, but it provides a good idea where Opera 11 currently stands.

In Sunspider, Opera 11 is just slightly behind Chrome as well as IE9 Beta. It is about 5% faster than Opera 10.71 on our 6-core system, where the browser posted a performance of 273 ms. There is not much room in performance improvements left and the differences between the leading browsers are negligible.

In Kraken, Chrome 10 can shine with its Crankshaft engine and is substantially faster than any other browser. Opera 11 is slightly faster than its predecessor, which we clocked in at 14,256 ms.

V8 has been Google’s territory, but Opera remains the second fastest browser in this discipline – even if it is far behind Chrome. Opera 10.71 posted a score of 3275.

No surprises as far as Google is concerned in Celtic Kane, but we were surprised to see the notebook run Opera faster through this parcours than the hexa-core system.
Beyond the numbers
We will run a complete benchmark test with all 245 tests over the weekend, but we already get a feeling that there is not much to report in terms of performance for Opera. This browser is more about its stacked tabs, which follows a trend where browser developers are trying to find ways to organize a flood of tabs in the same window. Stacking is not as disruptive as Mozilla’s Panorama, for example, and may be a more comfortable solution for some users. Then there are refreshed mouse gestures in opera 11, which I am personally not a friend of, but I hear that there are many users who actually like to use mouse movements as shortcuts.
The big news about Opera 11 is the lacking hardware acceleration, which isn’t a big deal today (other than a marketing problem), since there are very few sites that take advantage of hardware acceleration anyway.
What makes Opera’s decision interesting is the fact that the company promises to bring hardware acceleration to all platforms and not just Windows Vista and Windows 7. Mozilla has talked about such an approach recently, but said that it is a lot of work to come up with a working solution to run hardware acceleration under Windows XP. If Opera can make it work, then Opera 11 is without doubt the most attractive browser for Windows XP, which still owns about half of the global installed base of operating systems.
Tagged under:

Free Your Console With an Xbox 360 Wireless Adapter


Without an Xbox 360 wireless adapter, there’s no way to connect the console to the internet unless you run ethernet wires all throughout your house. No one wants cables strewn about the floor, especially in an age where wireless technology is so prominent.
That’s why one of the best things about the new Xbox 360 Slim consoles is that they include integrated wireless support. Unfortunately older Phat and Elite consoles do not include wireless technology built-in, which means users must either take advantage of an ethernet cord or connect the optional wireless adapter.
There are two completely different versions of the Xbox 360 wireless adapter, one for use with Wireless G type routers and another for use with Wireless N type routers.

Xbox 360 Wireless Adapter Features

Both Xbox 360 wireless adapter models are connected to the Xbox console via an available USB port, and can be set-up, operated and controlled via the Xbox dashboard. The Xbox 360 wireless adapter enables the console to take advantage of wireless internet support, which includes online gaming, media streaming, marketplace browsing and of course any other internet-ready features the Xbox 360 console offers. Of course to take full advantage of the Xbox 360 wireless adapter’s internet capability an active Xbox Live gold membership is required.
Ad-Hoc system link support is also available between Xbox 360 consoles that are connected by a wireless adapter, which means games that support local system link play can be taken advantage of even if the consoles are not connected through a physical cable.
The Xbox 360 Wireless AdapterXbox 360 Wireless Adapter (Wireless G)
The Xbox 360 wireless adapter (G) includes support for 802.11 a/b/g wireless networks. Microsoft claims the Wireless G network adapter provides support for up to twice the normal range of an a/b/g enabled router, which basically means the adapter can be used far from the wireless transmitter. Microsoft even claims the Xbox 360 wireless adapter is strong enough to operate in a “wireless congested environment”.
Xbox 360 Wireless Adapter (Wireless N)
The Xbox 360 wireless adapter (N) includes support for 802.11 a/b/g wireless networks, but what sets the Wireless N adapter apart from the other model is the fact that it supports N based connection networks as well. The Xbox 360 wireless adapter N is compatible with dual band 5GHz and 2.4Ghz wireless networks, which means it has a greater compatibility range.
The Xbox 360 wireless adapter N includes two antennas for increased connectivity, and is only available in black which is meant to match the new Xbox 360 Elite and Slim console models.
Xbox 360 Wireless Network AdapterWireless N technology is fairly new and is considered by many to still be experimental, which basically means the supporting software is still under development. Wireless N routers generally have a much wider signal range and provide faster transfer speeds for computer to computer file sharing, but have no confirmed speed changes relating to internet streaming and connectivity.
Of course, Wireless G is the current industry standard but realistically Wireless N will eventually be used more consistently, most wireless routers now support Wireless N signals.
Wireless N devices are compatible with Wireless G routers, which means users who purchase the Wireless N Xbox 360 wireless adapter will still be able to connect to home networks that utilize Wireless G signals – although the Wireless N adapter will only be able to use Wireless G signals and not the Wireless N standard.

Xbox 360 Wireless Adapter Availability

Xbox 360 Slim ConsoleThe original Xbox 360 wireless adapter G is not as readily available thanks to the introduction of the Wireless N adapter. Considering Microsoft now only sells and manufactures the Xbox 360 slim model there really is no need for the Wireless G adapter, especially since old Xbox Phat models are compatible with the newer Wireless N adapter. Thus it’s worth noting that when shopping for an Xbox 360 wireless adapter it doesn’t matter which model a user purchases unless of course they desire the increase in benefits from the Wireless N adapter (which the Wireless G adapter does not have).

More Information About The Xbox 360 Wireless Adapter

Xbox 360 Wireless AdapterAll Xbox 360 wireless adapters (both internal and external) support only WEP, WPA and WPA2 based network encryption.
It is possible to use third party wireless adapters and wireless bridges with the Xbox 360 console but such accessories are not supported or endorsed by Microsoft.
The new Xbox 360 slim models include an integrated wireless adapter, so there’s no use for an external adapter; there is however a slight exception, the integrated slim adapter is only compatible with 2.4GHz networks which means if users want to connect to a 5GHz network they will still be required to invest in the external Xbox 360 wireless adapter. The Xbox 720 is also expected to include an integrated wireless adapter.
The cheapest place we found to purchase an Xbox 360 wireless adapter is Amazon. You can get the Xbox 360 wireless adapter (G) model for less than $70 and the Xbox 360 wireless adapter (G) model for less than $55 (at the time of writing).
Tagged under:

iPhone 6 Rumors And Predictions: Specs, Features, Design…


Although the Apple iPhone 5 is yet to be announced, users over the Web have already started searching for the iPhone 6 features, specifications, and more enthusiastically the design. It’s quite funny to know how obsessed people have become with Apple products, especially with the iPhone and iPad.
With such a huge popularity, Apple doesn’t really have to shell out cash for advertising or marketing their products. Word of mouth alone is enough for Apple to stay ahead of the competition.
I must confess that it has become more like a competition between fans to find information of the unannounced products. As I was doing my research on this, I found a number of blogs dedicated to the iPhone 6 already, and to my surprise, they are updated quite regularly.
The Apple iPhone 6 is far away from its actual release. With Apple releasing different versions of the iPhone (“S” launches), it’ll definitely take a few more years before Apple announces the iPhone 6.
At this point in time, there is very little information available about the features, specifications and designs of the iPhone 6. We don’t even know if the 6th generation of the iPhone will even be called ‘iPhone 6′ or something else. However, what we know and have analyzed that fans across the Web have a lot of expectations especially with designs.
iPhone 6
Apple has always been known for its innovative thoughts and ideas they come up with. It’s not just with the products, but also with the applications that their products run. For instance, take a look at Siri. We never know what Siri can do in the iPhone 6. Probably it can understand what a dog is barking about and translate it into human language?
We have already discussed some of the features and specifications that are expected to arrive in the iPhone 5. Although Apple fans were quite disappointed after the release of iPhone 4S, the expectations have grew even more and hopefully they are not disappointed at least this time.
Coming back to the Apple iPhone 6, we have found the best available information for you, but please keep in mind that these are just speculations and expectations of fans, and there’s nothing official about it.

Apple iPhone 6 Features

iPhone 6 Design

The design is much talked feature of the Apple iPhone 6 around the Web. Fans are expecting that the iPhone 6 will features a curved screen design. Having said that, the iPhone 6 might look something like the Sony Xperia Arc. The rumor originated when Apple contacted the G-Tech and Fuji Crystal, the lens technology companies, and made a requirement of equipment for polishing curved glass.
This curved design concept is also expected to come in the iPad. It is also said that Apple has purchased 200 to 300 glass cutting machines, specialized in cutting curved glass. The curved glass design was expected to arrive in the iPhone 5, however, looks like that just remained a rumor.
The other thing in terms of design is body of the iPhone 6. Apple has been granted a patent, which indicates that the future iPhone versions will be made from a single piece of metal. The patent tells us that the iPhone body is cut from a single metal piece, which will be much lighter and thinner compared to current and previous iPhones.
The metal body of the iPhone will include an incredible curvy and contemporary design with the sides rounded and with a curved bottom surface. Again, many said that such a design will arrive in the iPhone 5, but that’s just a rumor.
Apple iPhone 6

iPhone 6 to have p-Si LCD Screen

p-Si LCD is the next generation display technology developed by Sharp. It stands for PolySilicon Liquid Crystal Display, and has a number of advancements and new features, which is probably expected to feature in the iPhone 6. One of the major advantage of the p-Si LCD screen is the monolithic integration – the driver circuits of the display can be integrated directly into display.
It is also said that the screen is made thinner and lighter while consuming less battery power compared to the current LCD technologies.

iPhone 6 to have a Projector

There are possibilities that the iPhone 6 will feature a built-in projector facility enabling users to project a video or image on a flat surface at a short distance. The detailed patent application reveals how Apple has been working on a Pico-like projector for iOS devices and how these projectors will work with a shared workspace in presentations.
iPhone 6
This will include advanced gestures that will be able to interpret shadow and silhouette gesturing associated with presentations in a darkened environment.

Wireless iPhone 6

Apple has been experimenting with the new feature that enables the user to charge the iPhone wirelessly. With the popularity of inductive charging, which uses electromagnetics to wirelessly charge a device, it would definitely come as a surprise to all Apple fans if the iPhone 6 will be capable of doing the same. There are few phones in the market that have already been experimenting with the inductive charging technology.
It is also rumoured that Apple has been working on to charge a device using solar charger.
At the Worldwide Developers Conference in June last year, the most promising feature of the iOS 5 was the capability of receiving updates wirelessly. That way, users will no longer have to connect their iPhone to a computer and use iTunes to transfer data.

Other Features in the iPhone 6

Apart from all these, we expect that the iPhone 6 will include the following features. Although most of them will be present in the iPhone 5, we can expect some advance technologies and updates in them:
Multitasking
In the world of multitasking and quad core processors, Apple will certainly look forward to develop the iPhone 6 in a way to handle multiple tasks efficiently and quickly.
Videos & Photos
I’m sure that the iPhone 6 will feature the world’s best camera with advance technology. With such a huge popularity in the field of photography, I think that the iPhone 6 will completely replace the point and shoot digital cameras. I presume that the 6th generation of the iPhone will have better resolution camera with HD quality video recording.
Organization
It is going to be much easier to organize and access your files and photos in the iPhone 6. Apple will surely work on this to make user experience friendly enough. Perhaps there could be a separate folder for several categories like health, finance, games, and so on.
128 GB Storage Space
In addition to the 16GB, 32GB and 64GB, Apple plans to include another version of the iPhone with a storage capacity of 128GB, and will be priced at a considerably higher price tag.

iPhone 6 Release Date

Some people say that the iPhone 5 should be technically called as the iPhone 6, since Apple released the iPhone 4S, which was supposed to be the iPhone 5. Well in that case, if the iPhone 5 is called as the iPhone 6, then we might expect a release sometime during this year. However, launching the next iPhone as iPhone 6 is something which I don’t foresee and this should simply remain a rumor.
iPhone 6 Launch
Well, no matter when the iPhone 6 will release, it is certainly going to blow everyone’s mind by giving the greatest experience to users with some of the world’s best and outstanding technology. Until then, let the crazy talks about the iPhone 6 continue to boom!
Tagged under:

Xbox 720 – The Used Games Rumor


Recently there has been a rumor going around about the Xbox 720 and its ability, or lack thereof, to play used games. Various sources, forums, fans, and non-fans are all speculating about this rumor; used games will not function on the new Xbox 720 console.

Xbox 720 & Used Games – Who it Hurts

If you were to ask consumers who Microsoft will hurt by not allowing the Xbox 720 and used games the ability to work together, the majority would tell you (with strong opinions) it hurts them, the consumer.
There are also others that could be hurt. Used game retailers and the video game rental industry are two markets that could potentially take a big hit, depending on how the specifics would play out.
Xbox 720 Used GamesCompanies such as GameStop and retailers like pawn shops receive large revenues from the sale of used video games. These companies are able to purchase games from consumers at low prices, sell the used games for a drastically higher price, and all the revenue is theirs to keep. If used games are a thing of the past, these companies would need to rethink their business model.
Gamefly, Blockbuster, and Redbox are all big names in the video game rental industry. If it was clear that used games could absolutely no longer be used on consoles, it would destroy companies such as Gamefly that would likely cease to exist.
Used Game StoreThere are methods being discussed that could provide a work-around for these downfalls. For example, GameStop could be able to resell a used disc (if games are still on discs), but they would have to purchase a new activation code from the developer. When a consumer purchases the game from GameStop, they would need this separately purchased code to have access to the software.
For rentals, a system could be in place where the user would download the software or rent the disc, and then purchase an activation code that would be usable for a specified period of time.
As for people upset about the possible lack of ability to lend games that this policy may cause, Microsoft could use a method similar to what Amazon implemented for its Kindle Books lending policy. Amazon’s policy allows for someone to lend the license for a book they have purchased to another user for a short duration. During that time the original owner is not able to access that book.

Xbox 720 & Used Games – Who This Helps

Video Game DeveloperTwo of the main supporters for this possible ban on used games are the publishers and developers of video games. When games are sold on the resale market, developers do not receive any money. 100% of the sales go to the person or company that sells the used game.
This is a big problem for the developers who feel they should get a share of the money every time someone purchases their game for play. Developers feel that in order to keep producing quality games, they need to see a decent share of the revenue their game produces.

Xbox 720 & Used Games – How it Could Work

Though many fans are in uproar over this rumor, the potential relationship between the Xbox 720 and used games is not anything new in the entertainment industry. There is an abundance of games available for the PC that require an activation code in order for the software to be useable.
Steam is a method of digital distribution that is widely used in the gaming industry. Microsoft could put a similar method to work for the Xbox 720. Steam allows consumers to purchase content directly from the developer and publisher and skip the middle man reseller, which generally results in cost savings for every party involved.
One advantage of using a method such as Steam is the elimination of the retail store. A major factor in the dislike being portrayed by consumers is the price point of games. Currently most games are being sold for $60. However, if the retailer is cut out, the price for new games could drop drastically. The price for a new game could drop down to $30 or so, since the mark-up by the retailers will not be present.

Xbox 720 & Used Games – It’s Not a New Concept

Many people don’t realize that some entertainment devices already use similar methods to what is being rumored here.
Think about smartphones and tablets. To add software to these devices, you must purchase an app from the marketplace, and then download the app directly to the device. You don’t ever see a disc. And if you don’t want to use the app anymore, you cannot resell it. You just delete it and carry on. This method is cheaper for everyone involved, and if games for consoles went this route, the prices for their software would likely drop as well.
Tablet AppsSome fans of the Xbox are making threats such as, “If Microsoft does not allow used games on the Xbox 720, I’m jumping over to the PS4.” However, it is quite possible the next generation Sony console will take a similar approach towards used games.
Sony has already somewhat hindered the resale of games on their latest release, the Sony PS Vita. For the Vita it is still possible to purchase hard copies of games, but the same games are also available for download at a lower price through Vita’s marketplace.

Xbox 720 & Used Games – More Info Coming Soon

We will likely have to wait a while before we find out the specifics for the Xbox 720, Nextbox, or Durango (all names currently being used for Microsoft’s next generation console). Many sources were speculating that info would be released at CES 2012 in January, which didn’t happen. However, it is likely that Microsoft will reveal some more details about the Xbox 720 at the upcoming E3 Convention in June.
Steve BallmerThe relationship between the Xbox 720 and used games is just a rumor, but feel free to speculate, it is our right as humans. Another similar rumor I heard (and by heard I mean just made up) is that every time you turn on your Xbox, Microsoft CEO Steve Ballmer will come on the TV screen and shout “DEVELOPERS, DEVELOPERS, DEVELOPERS” at you for 30 seconds before you are able to access any menu items.
What are your thoughts on all this?  Will the presence of Steve Ballmer on your screen and the lack of used games prevent you from purchasing this new system?  Or are you one of the few that are optimistic and see the benefits that this method may provide, such as lower price points and convenience?