
Click the image below to see it in full size.

Unzip the archived file you downloaded, go to the “templates” folder and then go to the “photoshop” folder. You will find three .PSD files. Each of these files contains a grid with 12, 16 and 24 columns. In this tutorial we will be using the 12 columns grid.
The .PSD files have some guides already set up, which will be very useful. To activate the guides, go to View > Show > Guides, or use the shortcut Ctrl/Cmd + ;.
During this tutorial you will need to create shapes with specific dimensions. To see the exact size of a shape or selection while you are creating it, open the Info Panel by going to Window > Info. The width and the height of your shapes and selections will be displayed in this panel.
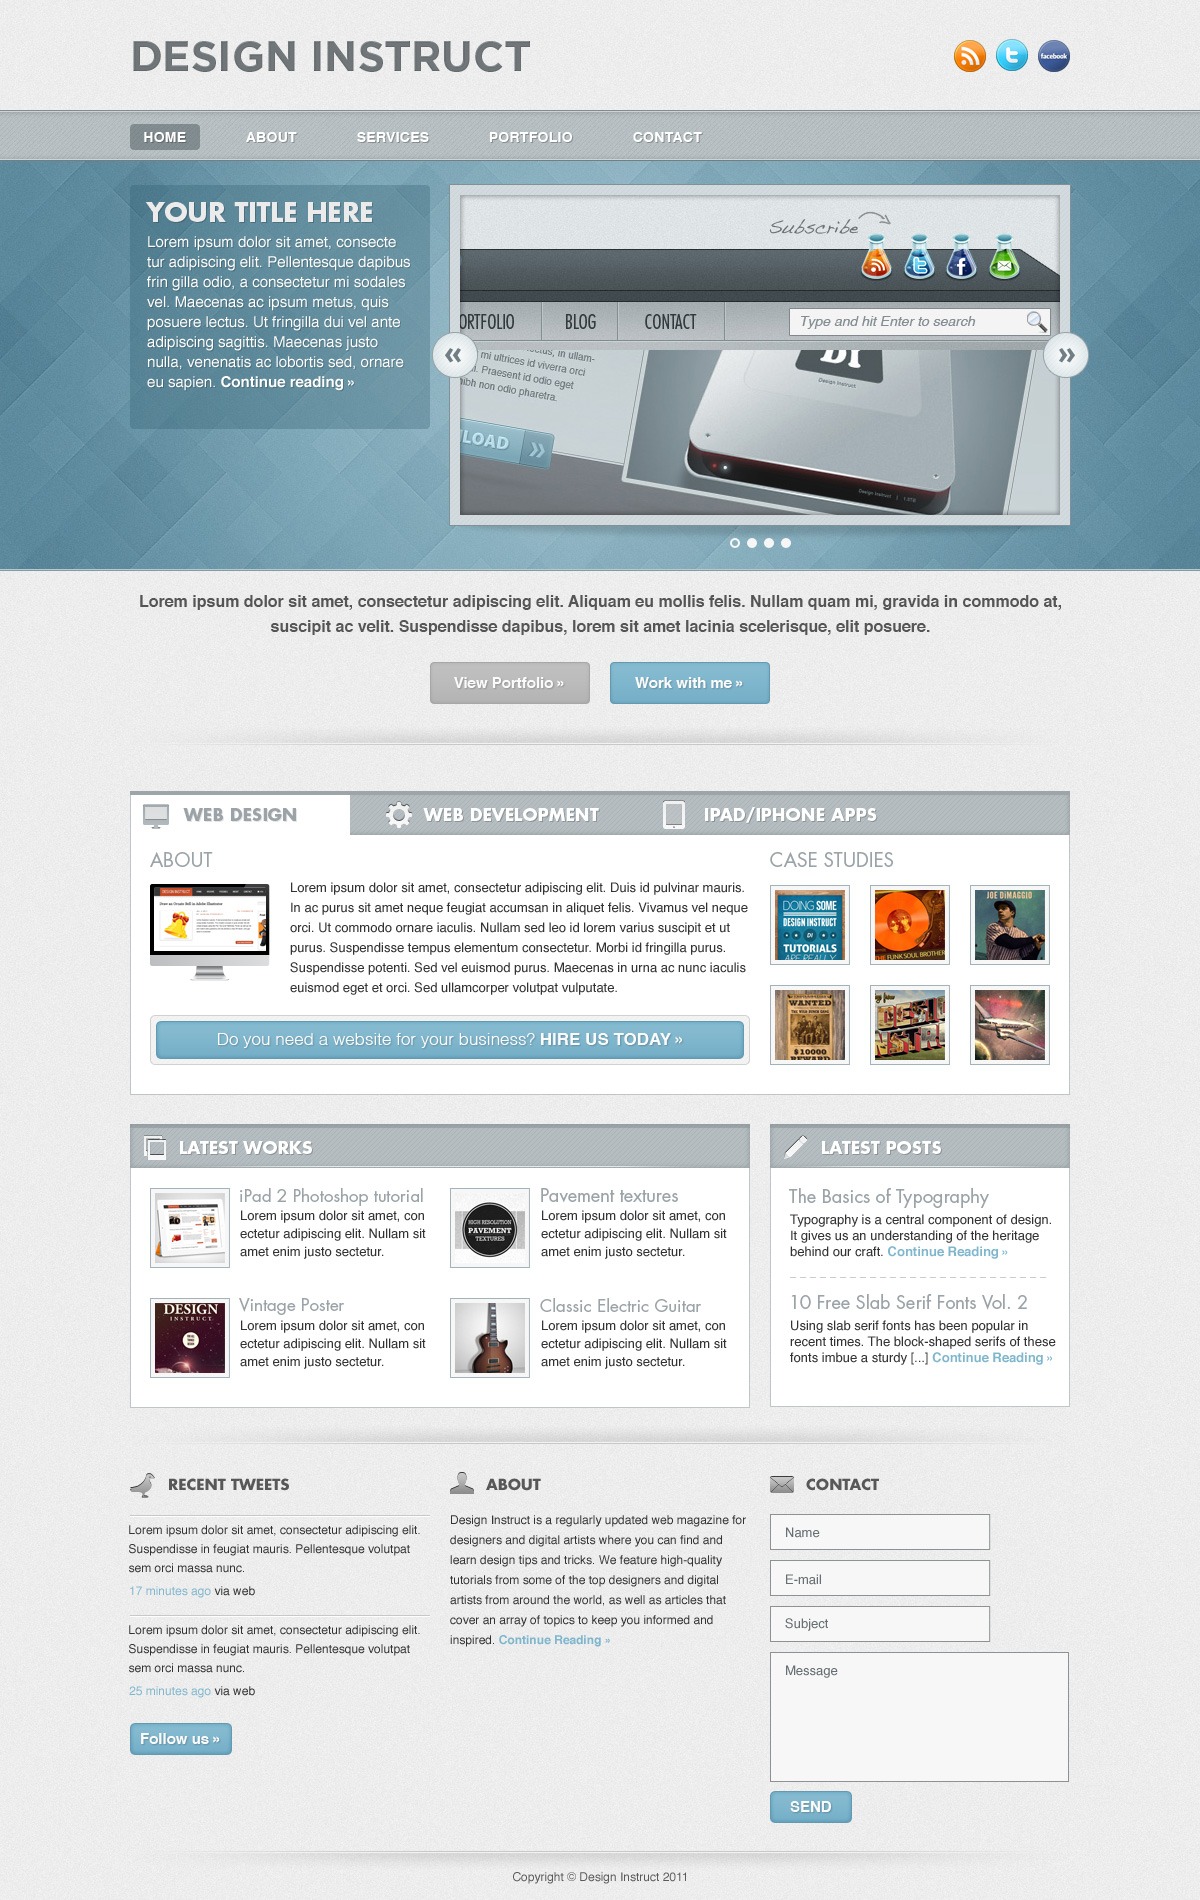
Now that we covered the basics of using the 960 Grid System, we can move on to creating the web layout. Let’s get started!
Tip: If you need a more thorough guide for using 960 GS, I suggest reading the guide called The 960 Grid System Made Easy.

Now we will change the color of the background from white to a light gray. With the "Background" layer selected, click on the little black lock icon from the top of the Layers panel to unlock this layer. Then change the color of the background layer to #ededed.
Right-click on this layer and select Convert to Smart Object. Then go to Filter > Noise > Add Noise and set the Amount to 1%, the Distribution to Gaussian and tick the Monochromatic box.

Double-click on your text layer to open the Layer Style window and use the settings from the following image.

Now we will add the social media icons. Download this set of icons and open the RSS, Twitter and Facebook icons in Photoshop (or any other icons you want to include in your design). Use the Move Tool (V) to move these icon into your web layout document and put them in the right side of the web layout. Leave a distance of 10px between icons.
Select all these layers, hit Ctrl/Cmd + G to group them and name the group "social icons".

Create a new layer (Ctrl/Cmd + Shift + N) and fill the selection with black. Then hide the "Background" layer by clicking on its eye icon.
To create the pattern, go to Edit > Define Pattern and click OK. Now you can close this document.

Double-click on this layer to open the Layer Style window and use the settings from the following image. Then go to Filter > Noise > Add Noise and add a 0.59% Gaussian Monochromatic noise.

Select the Line Tool (U), set the Weight to 1px and create a horizontal line at the top of your navigation bar using the color #cdd3d7. Name this layer "1px line".
Duplicate this layer (Ctrl/Cmd + J), select the Move Tool (V) and hit the up arrow key on your keyboard to move this layer 1px upwards. Set the color of the new line to #818b91.
Now add two more horizontal lines at the bottom of the navigation bar using the same colors.

Add a drop shadow effect to these text layers using the settings from the image below.

Select the Rounded Rectangle Tool (U), set the Radius to 4px and create a black rounded rectangle with the dimensions 70px by 26px and the color #1d2d34 over the first navigation menu item. Name this layer "active menu item", put it underneath the text layer and set its opacity to 35%.

Hit the "D" key on your keyboard to reset the foreground and background colors to black and white. Create a new layer (Ctrl/Cmd + Shift + N) and go to Filter > Render > Clouds.

Right-click on the "Layer 1" layer and select Convert to Smart Object. Then go to Filter > Pixelate > Mosaic and set the Cell Size to 40.

Duplicate the "Layer 1" layer (Ctrl/Cmd + J). Then go to Filter > Other > High Pass and set the radius to 5px. Set the blend mode of this layer to Hard Light. This will make mosaic effect sharper and add some shadow around the squares.

Now we will make the mosaic effect even sharper. Create a new layer above all the other ones (Ctrl/Cmd + Shift + N). Then go to Image > Apply Image and click OK. This will create a rasterized image from all the current layers, but keep all the other layers intact. You can also use the shortcut Ctrl/Cmd + Alt/Option + Shift + E.
Right-click on the layer that you created and select Convert to Smart Object. I usually like to use Smart Object whenever I can so I know what filters I have previously applied and to play around with the filters.
Now go to Filter > Sharpen > Sharpen. Hit Ctrl/Cmd + F to apply this filter one more time. Two times should be enough for the image to get those nice highlights between squares.

Go to Layer > New Adjustment Layer > Brightness/Contrast and use the settings from the following image. Then create a new layer above all the other ones and go to Image > Apply Image to create a rasterized image of all the layers.
To create the first pattern go to Edit > Define Pattern and click OK. In the next steps I will show you how to use this pattern to create a diagonal mosaic pattern. Do not close this document, we will it later.

Now comes the tricky part – creating the diagonal mosaic pattern. I tried a few different techniques in order to achieve this, but only one was successful and I will explain it to you in the following steps. I am not sure this is the best way to do it, but it does work.
Create a new document (Ctrl/Cmd + N) with the dimensions 800px by 800px. Create a new layer (Ctrl/Cmd + Shift + N) and fill it with white. Double-click on this layer to open the Layer Style window and apply the pattern you created at the previous step.

Right-click on the "Layer 1" layer and select Convert to Smart Object. Then go to Edit > Free Transform (Ctrl/Cmd + T), hold down the Shift key and rotate this layer 45°.

Go back to the document where you created the initial mosaic effect and move the rasterized layer ("Layer 4") into this new document.
Right-click on this layer and select Convert to Smart Object. Then use Free Transform (Ctrl/Cmd + T) to rotate this layer 45° as well.
Select the Move Tool (V) and move this layer around to integrate it in the background pattern. I used the darker square from pattern as reference in order to find the right position for this layer. You can also use the arrow keys while having the Move Tool (V) selected in order to move the layer pixel by pixel. In the image below I highlighted the small pattern with red so you can see it.
Tip: to test if the small pattern is integrated in the background pattern, you can make its layer invisible and then visible again. If you don’t see any differences in your image, the layer is in the right position.

Hold down the Ctrl/Cmd key and click on the thumbnail of "Layer 2" to create a selection of the small pattern. Then activate the Rulers (Ctrl/Cmd + R) and drag some guides from the rulers towards each corner of the selection, as you see in the image below.

Now the square that was formed using the guides will be our new pattern. Hit Ctrl/Cmd + D to deselect. Then delete the layer of the small pattern. We don’t need it anymore.
Select the Rectangular Marquee Tool (M) and select the square between guides.

With the "Layer 1" layer selected go to Edit > Copy (Ctrl/Cmd + C). Create a new document (Ctrl/Cmd + N). Photoshop will use the dimensions of the selection you made as dimensions for the new document. Click OK and paste (Ctrl/Cmd + V) the image you selected.
Now go to Edit > Define Pattern, give your pattern a name and click OK.

Double-click on this layer to open the Layer Style window and use the settings from the following image. Then go to Filter > Noise > Add Noise and add a 0.6 Gaussian Monochromatic noise.

Use the Line Tool (U) to create two horizontal lines with the weight 1px at the bottom of the image slider background. For the first line use the color #b8c8ce and for second one use #849ba4.


Create a new rectangle with the dimensions 600px by 320px and put it in the middle of the previous rectangle that you created. Name this layer "image_holder", double-click on it to open the Layer Style window and use the settings from the following image for Inner Glow.

Open an image in Photoshop that you want to display in your image slider. Use the Move Tool (V) to move it into your initial document and put it over the "image_holder" layer.
Name this layer "image", right-click on it and select Create Clipping Mask to make it visible only over the area of the "image_holder" layer.

Now we will create a shadow at the bottom of the image slider. Select the Ellipse Tool (U), hold down the Shift key and create a black circle in the middle of the bottom edge of the image slider (1).
Name this layer "shadow", right-click on it and select Convert to Smart Object. Then go to Filter > Blur > Gaussian Blur and set the Radius to 3px. Then go to Edit > Free Transform, hold down the Alt/Option + Shift keys and drag the right edge of the layer until it reaches the right edge of the image slider. Take a look at the following image for reference (2).
Put this layer underneath the "border" layer and set its opacity to 15% (3, 4).

Now we will create some radio buttons to indicate how many images does the slider contain and which is the active one. Create a new group and name it "radio buttons". Then select the Ellipse Tool (U), hold down the Shift key and create a circle shape with the color #f6f6f6 and the diameter 10px. Name this layer "radio button".
Duplicate this layer (Ctrl/Cmd + J) a few times and arrange your circle shapes as you see in the following image.
Now create another circle in the middle of the first one using the color #8bb2bf and the diameter 6px. Name this layer "active".

Copy this symbol "»" go back to Photoshop, select the Type Tool (T) and paste it. I used the font Gotham Bold with the size 32pt and the color #727e84. Put this arrow in the middle of the circle.

Duplicate the "right arrow" group (right-click on it and select Duplicate Group). Then go to Edit > Transform > Flip Horizontal. Put this new group in the left side of the image slider and name it "left arrow".

Select the Type Tool (T) and add some content in this area. For the headline I used the font Futura Bold with the size 26pt and the color #ebebeb. For the block of text I used Helvetica Regular with the size 15pt and the color #ffffff. Add a Drop Shadow effect to these text layers using the settings from the image below.


Now we will add some call-to-action buttons underneath the paragraph of text. Create a new group and name it "buttons". Then select the Rounded Rectangle Tool (U), set the Radius to 4px and create a rounded rectangle with the color #bbbbbb, as you see in the image below. Name this layer "button", double-click on it to open the Layer Style window and use the settings from the following image. For the Stroke effect I used the color #a7a7a7.

Select the Type Tool (T) and add some text to your button such as "View Portfolio »". I used the font Helvetica Bold with the size 15pt and the color #fafafa.

Create another button using the same settings, but change its color to #7fb6cd and the Stroke effect color to #6799ad.

Duplicate this layer (Ctrl/Cmd + J), move it one pixel upwards and change its color to #f2f2f2.
Now we will add a gradient to the separator. Select the Rectangular Marquee Tool (M) and create a selection above the two horizontal lines with the dimensions 940px by 18px. Create a new layer and fill the selection with black. Name this layer "gradient" and hit Ctrl/Cmd + D to deselect (1).
Double-click on the "gradient" layer to open the Layer Style window and use the settings from the following image (2).

Add a mask to the "separator" group (Layer > Layer Mask > Reveal All). Then select the Gradient Tool (G), hold down the Shift key and drag a black to transparent gradient in the left side of the separator to make it fade out. Do the same for the right side of the separator. Take a look at the following image for reference.
Then right-click on the "separator" group and select Convert to Smart Object.

Select the Rectangle Tool (U) and create a white rectangle with the dimensions 940px by 300px. Name this layer "main content bg" and add a 1px stroke effect to it using the color #bfc5c8.

Create a new group and name it "tabs". Select the Rectangle Tool (U) and create a rectangle with the height 44px at the top of the white rectangle using the color #b5bdc1. Name this layer "title bar", double-click on it to open the Layer Style window and use the settings from the following image.
Select the Rectangle Tool (U) again and create a rectangle with the height 4px and the color #9da5a9 at the top of the title bar. Name this layer "top line".

Select the Rectangle Tool (U) and create a white rectangle, as you see in the following image. This will be the active tab. Make sure this rectangle does not go over the "top line" layer and the stroke from the left side of the big white rectangle.
Select the Type Tool (T) and add the name of the service you want to display in this area. In my case, I put "Web Design" using the font Futura Bold with the size 17pt and the color #9ba3a8. I also added a Drop Shadow effect to this text layer.

Download this set of icons and open the .PSD file in Photoshop. Then move an icon that suits the name of the service into your initial document. I used the iMac icon. Put the icon in front of the service name, double-click on its layer and use the settings from the following image. The gradient that I used is from #b5bdc1 to #a1aab0.
Tip: to select the icon that you want without having to look through all the layers, select the Move Tool (V) and from the drop-down menu from the option bar above your image select ‘Layer’. Now hold down the Ctrl/Cmd key and click on the icon that you want to use. The layer of that icon will be automatically selected and you can move it into your web layout document.

Select the Type Tool (T) and add the name of other services to the title bar, such as "web development" or "iPad/iPhone apps". Use the same font that you used for the first service name (in my case Futura Bold), but change the color to white. Then add a Drop Shadow effect to these text layers using the settings from the image below.

Now add some icons for these services from the icons pack you downloaded earlier. Use the same layer style that you used for the first icon, but change the gradient colors to #f8f8f8 and #f0f0f0.

Download this iMac vector and open the .AI file in Illustrator. Select the iMac using the Selection Tool (V), copy it (Ctrl/Cmd + C), go back to Photoshop and paste it as smart object (Ctrl/Cmd + V). Name this layer "imac" and use Free Transform (Ctrl/Cmd + T) to change its size. Take a look at the following image for reference.

Select the Rectangle Tool (U) and create a rectangle over the computer screen. Name this layer "image_holder". Then open in Photoshop an image that you want to display on the screen and move it into your initial document using the Move Tool (V). Name this layer "image", put it over the screen, right-click on it and select Create Clipping Mask.

Select the Type Tool (T) and add a paragraph of text next to the image. I used the font Helvetica Regular with the size 13pt and the color #333333. Set the width of this text layer to 460px. Also, set the leading to 20pt from the Character panel to make the text more readable.

Now we will create a call-to-action button for the "services" area. First, select the Rounded Rectangle Tool (U), set the Radius to 5px and create a rounded rectangle with the dimensions 600px by 50px and the color #f3f3f3. Name this layer "button border", double-click on it to open the Layer Style window and use the settings from the following image. For the Stroke effect I used the color #d1d1d1.

Select the Rounded Rectangle Tool (U), set the Radius to 4px and create a rounded rectangle with the dimensions 586px by 36px and the color #7fb6cd in the middle of the gray rectangle. Name this layer "button", double-click on it to open the Layer Style window and use the settings from the following image. For the Stroke effect I used the color #6698ad.

Select the Type Tool (T) and add some text to your button. I used the font Helvetica with the size 17pt and the color #fafafa. Add a Drop Shadow effect to this layer using the settings from the image below.

Select the Rectangle Tool (U), hold down the Shift key and create a square with the dimensions 80px by 80px and the color #f7f7f7. Name this layer "border", double-click on it to open the Layer Style window and use the settings from the following image. For the Stroke effect I used the color #a3b2b9.

Create another square with the dimensions 70px by 70px in the middle of the "border" square shape. Name this layer "image_holder". Then open an image in Photoshop that you want to display in this area and move it into your initial document. Name this layer "image", put it over the "image_holder" layer, right-click on it and select Create Clipping Mask.
Hold down the Ctrl/Cmd key, select the "border", "image_holder" and "image" layers, and duplicate them five times (to duplicate these layers drag them over the "Create a new layer" button from the bottom of the Layers panel). Then arrange all your images as you see in the following image.

Make this area 620px wide and 280px high. Copy the colors and layer styles for the background, title bar and top line from the "services" area. Then add a headline for this area and an icon.

Now we will create a highlight for the title bar. Select the Line Tool (U), set the Weight to 1px and create a horizontal white line at the bottom of the title bar. Leave a distance of 1px between the bottom edge of the title bar and this layer (1).
Add a mask to this layer (Layer > Layer Mask > Reveal All). Select the Gradient Tool (G), hold down the Shift key and drag a black to transparent gradient in the left side of the white line to make it fade away. Do the same for the right side of the line. Name this layer "highlight" and set its opacity to 70% (2).

Now we will add some images for the latest projects and a short description of each project. Add an image like the ones you created for the "case studies" area.
Select the Type Tool (T) and add some text next to it. For the headline I used the font Futura Book with the size 17pt and the color #9ba3a8. For the paragraph of text I used the font Helvetica Regular with the size 13pt and the color #9ba3a8. Also, set the leading for the paragraph to 18pt from the Character panel.
The width of this project area should be 280px. Put all these layers inside a group (Ctrl/Cmd + G) and name it "project #1". Duplicate this group three times and arrange them as you see in the image below.

Select the Type Tool (T) and add a couple of posts to this area using the same fonts and colors that you used for the projects in the "portfolio" area. For the "Continue reading »" links I used the color #7fb6cd.

Now we will create a dashed line pattern which we will use for a horizontal separator. First, create a new document (Ctrl/Cmd + N) with the dimensions 10px by 1px.
Create a new layer (Ctrl/Cmd + Shift + N) and use the Rectangular Marquee Tool (M) to create a selection with the dimensions 6px by 1px. Fill this selection with black.
Hide the Background layer and go to Edit > Define Pattern. Give your pattern a name and click OK. Now you can close this document.
Go to your initial web layout document, select the Line Tool (U) and create a horizontal line with the dimensions 260px by 1px. Set the Fill of this layer to 0% and the Opacity to 20%.
Double-click on this layer to open the Layer Style window and use the settings from the following image for Pattern Overlay.


Now we will create an area for the Twitter feed. Create a new group and name it "recent tweets".
Move the bird icon from the icons pack you downloaded into your web layout document. Right-click on this layer and select Clear Layer Style. Then double-click on it to open the Layer Style window and use the settings from the following image. For the gradient I used the colors #8b8b8b and #c7c7c7.
Select the Type Tool (T) and write "Recent Tweets" next to the icon. I used the font Futura Bold with the size 15pt and the color #585858.

Select the Type Tool (T) and add a couple of tweets to this area. Make sure that the width of the text is 300px. I used the font Helvetica Regular with the size 12pt and the color #333333. For the links I used the color #7fb6cd.
I also added separators for the tweets using the Line Tool (U). I created two lines for each separator using the colors #c8c8c8 and #fefefe.

Add a button underneath the tweets that reads "Follow us »". Style this button just like the "Work With Me" button from the "description" area.

Select the Type Tool (T) and write "About" next to the icon using the same font and color that you used for "Recent Tweets" headline.
Now add a paragraph of text that is 300px wide.

Select the Type Tool (T) and write "Contact" next to the icon using the same font and color that you used for "Recent Tweets" and "About" headlines.
Select the Rectangle Tool (U) and create the rectangles of the contact form using the color #f7f7f7. Add a 1px Stroke effect to these layers using the color #8c9295. Then select the Type Tool (T) and write inside each box what it represents. I used the font Helvetica Regular with the size 13pt and the color #676f73.
Create a "Send" button underneath the contact form just like you created the "Follow us" button from the "Recent tweets" area.

Flip this layer vertically by going to Edit > Transform > Flip Vertical. Use the Move Tool (V) to move this layer underneath the footer area.
Select the Type Tool (T) and write a copyright statement. I used the font Helvetica Regular with the size 12pt and the color #5a5a5a.

Tutorial Resources
960 Grid System Introduction
In this tutorial, we will use the 960 Grid System to organize and arrange the elements of our web layout. Before we begin, download it to your computer.Unzip the archived file you downloaded, go to the “templates” folder and then go to the “photoshop” folder. You will find three .PSD files. Each of these files contains a grid with 12, 16 and 24 columns. In this tutorial we will be using the 12 columns grid.
The .PSD files have some guides already set up, which will be very useful. To activate the guides, go to View > Show > Guides, or use the shortcut Ctrl/Cmd + ;.
During this tutorial you will need to create shapes with specific dimensions. To see the exact size of a shape or selection while you are creating it, open the Info Panel by going to Window > Info. The width and the height of your shapes and selections will be displayed in this panel.
Now that we covered the basics of using the 960 Grid System, we can move on to creating the web layout. Let’s get started!
Tip: If you need a more thorough guide for using 960 GS, I suggest reading the guide called The 960 Grid System Made Easy.
Step 1: Creating the Background of the Web Layout
Open the "960_grid_12_col.psd" file in Photoshop. Then go to Edit > Canvas Size and set the width to 1200px and the height to 1900px. You can adjust the height later on if you need more space for the web layout.Now we will change the color of the background from white to a light gray. With the "Background" layer selected, click on the little black lock icon from the top of the Layers panel to unlock this layer. Then change the color of the background layer to #ededed.
Right-click on this layer and select Convert to Smart Object. Then go to Filter > Noise > Add Noise and set the Amount to 1%, the Distribution to Gaussian and tick the Monochromatic box.
Step 2: Creating the Header
We will create a simple header with the name of the web layout and some social media icons. Create a new group and name it "Header". Then select the Type Tool (T) and write the name of your layout. I used the font Gotham Bold with the size 42pt and the color #707679. Align this layer with the grid, as you see in the image below.Double-click on your text layer to open the Layer Style window and use the settings from the following image.
Now we will add the social media icons. Download this set of icons and open the RSS, Twitter and Facebook icons in Photoshop (or any other icons you want to include in your design). Use the Move Tool (V) to move these icon into your web layout document and put them in the right side of the web layout. Leave a distance of 10px between icons.
Select all these layers, hit Ctrl/Cmd + G to group them and name the group "social icons".
Step 3: Creating a Diagonal Stripe Pattern
Now we will create a pattern that we will use for the navigation bar and other areas of the web layout. Create a new document (Ctrl/Cmd + N) with the dimensions 5px by 5px. Select the Rectangular Marquee Tool (M), hold down the Shift key and create five square selections, as you see in the image below.Create a new layer (Ctrl/Cmd + Shift + N) and fill the selection with black. Then hide the "Background" layer by clicking on its eye icon.
To create the pattern, go to Edit > Define Pattern and click OK. Now you can close this document.
Step 4: Creating the Navigation Bar
Create a new group and name it "Navigation". Select the Rectangle Tool (U) and create a rectangle with the height 50px and the same width as your document. Use the color #b8c0c3. Right-click on this layer and select Convert to Smart Object.Double-click on this layer to open the Layer Style window and use the settings from the following image. Then go to Filter > Noise > Add Noise and add a 0.59% Gaussian Monochromatic noise.
Select the Line Tool (U), set the Weight to 1px and create a horizontal line at the top of your navigation bar using the color #cdd3d7. Name this layer "1px line".
Duplicate this layer (Ctrl/Cmd + J), select the Move Tool (V) and hit the up arrow key on your keyboard to move this layer 1px upwards. Set the color of the new line to #818b91.
Now add two more horizontal lines at the bottom of the navigation bar using the same colors.
Step 5: Adding the Navigation Menu Items
Select the Type Tool (T) and write the name for your navigation menu items. I used the font Helvetica Bold with the size 14pt and the color #ffffff.Add a drop shadow effect to these text layers using the settings from the image below.
Select the Rounded Rectangle Tool (U), set the Radius to 4px and create a black rounded rectangle with the dimensions 70px by 26px and the color #1d2d34 over the first navigation menu item. Name this layer "active menu item", put it underneath the text layer and set its opacity to 35%.
Step 6: Creating a Pattern for the Slider
Now I will show you a technique for creating a seamless mosaic pattern for the image slider background. Create a new document (Ctrl/Cmd + N) with the dimensions 200px by 200px.Hit the "D" key on your keyboard to reset the foreground and background colors to black and white. Create a new layer (Ctrl/Cmd + Shift + N) and go to Filter > Render > Clouds.
Right-click on the "Layer 1" layer and select Convert to Smart Object. Then go to Filter > Pixelate > Mosaic and set the Cell Size to 40.
Duplicate the "Layer 1" layer (Ctrl/Cmd + J). Then go to Filter > Other > High Pass and set the radius to 5px. Set the blend mode of this layer to Hard Light. This will make mosaic effect sharper and add some shadow around the squares.
Now we will make the mosaic effect even sharper. Create a new layer above all the other ones (Ctrl/Cmd + Shift + N). Then go to Image > Apply Image and click OK. This will create a rasterized image from all the current layers, but keep all the other layers intact. You can also use the shortcut Ctrl/Cmd + Alt/Option + Shift + E.
Right-click on the layer that you created and select Convert to Smart Object. I usually like to use Smart Object whenever I can so I know what filters I have previously applied and to play around with the filters.
Now go to Filter > Sharpen > Sharpen. Hit Ctrl/Cmd + F to apply this filter one more time. Two times should be enough for the image to get those nice highlights between squares.
Go to Layer > New Adjustment Layer > Brightness/Contrast and use the settings from the following image. Then create a new layer above all the other ones and go to Image > Apply Image to create a rasterized image of all the layers.
To create the first pattern go to Edit > Define Pattern and click OK. In the next steps I will show you how to use this pattern to create a diagonal mosaic pattern. Do not close this document, we will it later.
Now comes the tricky part – creating the diagonal mosaic pattern. I tried a few different techniques in order to achieve this, but only one was successful and I will explain it to you in the following steps. I am not sure this is the best way to do it, but it does work.
Create a new document (Ctrl/Cmd + N) with the dimensions 800px by 800px. Create a new layer (Ctrl/Cmd + Shift + N) and fill it with white. Double-click on this layer to open the Layer Style window and apply the pattern you created at the previous step.
Right-click on the "Layer 1" layer and select Convert to Smart Object. Then go to Edit > Free Transform (Ctrl/Cmd + T), hold down the Shift key and rotate this layer 45°.
Go back to the document where you created the initial mosaic effect and move the rasterized layer ("Layer 4") into this new document.
Right-click on this layer and select Convert to Smart Object. Then use Free Transform (Ctrl/Cmd + T) to rotate this layer 45° as well.
Select the Move Tool (V) and move this layer around to integrate it in the background pattern. I used the darker square from pattern as reference in order to find the right position for this layer. You can also use the arrow keys while having the Move Tool (V) selected in order to move the layer pixel by pixel. In the image below I highlighted the small pattern with red so you can see it.
Tip: to test if the small pattern is integrated in the background pattern, you can make its layer invisible and then visible again. If you don’t see any differences in your image, the layer is in the right position.
Hold down the Ctrl/Cmd key and click on the thumbnail of "Layer 2" to create a selection of the small pattern. Then activate the Rulers (Ctrl/Cmd + R) and drag some guides from the rulers towards each corner of the selection, as you see in the image below.
Now the square that was formed using the guides will be our new pattern. Hit Ctrl/Cmd + D to deselect. Then delete the layer of the small pattern. We don’t need it anymore.
Select the Rectangular Marquee Tool (M) and select the square between guides.
With the "Layer 1" layer selected go to Edit > Copy (Ctrl/Cmd + C). Create a new document (Ctrl/Cmd + N). Photoshop will use the dimensions of the selection you made as dimensions for the new document. Click OK and paste (Ctrl/Cmd + V) the image you selected.
Now go to Edit > Define Pattern, give your pattern a name and click OK.
Step 7: Creating the Image Slider Background
Now we will apply the pattern to the image slider background. Create a new group and name it "Image Slider". Select the Rectangle Tool (U) and create a rectangle with the height 410px and the same width as your document. Use the color #81aaba. Name this layer "slider_bg", right-click on it and select Convert to Smart Object.Double-click on this layer to open the Layer Style window and use the settings from the following image. Then go to Filter > Noise > Add Noise and add a 0.6 Gaussian Monochromatic noise.
Use the Line Tool (U) to create two horizontal lines with the weight 1px at the bottom of the image slider background. For the first line use the color #b8c8ce and for second one use #849ba4.
Step 8: Creating the Image Slider
Create a rectangle with the dimensions 620px by 340px and the color #d2dade. Double-click on this layer to open the Layer Style window and use the settings from the following image. For the Stroke effect I used the color #819098.Create a new rectangle with the dimensions 600px by 320px and put it in the middle of the previous rectangle that you created. Name this layer "image_holder", double-click on it to open the Layer Style window and use the settings from the following image for Inner Glow.
Open an image in Photoshop that you want to display in your image slider. Use the Move Tool (V) to move it into your initial document and put it over the "image_holder" layer.
Name this layer "image", right-click on it and select Create Clipping Mask to make it visible only over the area of the "image_holder" layer.
Now we will create a shadow at the bottom of the image slider. Select the Ellipse Tool (U), hold down the Shift key and create a black circle in the middle of the bottom edge of the image slider (1).
Name this layer "shadow", right-click on it and select Convert to Smart Object. Then go to Filter > Blur > Gaussian Blur and set the Radius to 3px. Then go to Edit > Free Transform, hold down the Alt/Option + Shift keys and drag the right edge of the layer until it reaches the right edge of the image slider. Take a look at the following image for reference (2).
Put this layer underneath the "border" layer and set its opacity to 15% (3, 4).
Now we will create some radio buttons to indicate how many images does the slider contain and which is the active one. Create a new group and name it "radio buttons". Then select the Ellipse Tool (U), hold down the Shift key and create a circle shape with the color #f6f6f6 and the diameter 10px. Name this layer "radio button".
Duplicate this layer (Ctrl/Cmd + J) a few times and arrange your circle shapes as you see in the following image.
Now create another circle in the middle of the first one using the color #8bb2bf and the diameter 6px. Name this layer "active".
Step 9: Creating the Image Slider Arrows
Create a new group and name it "right arrow". Then select the Ellipse Tool (U), hold down the Shift key and create a circle with the color #e7edef and the diameter 45px. Name this layer "circle" and put it in the right side of the image slider. Double-click on this layer to open the Layer Style window and use the settings from the following image.Copy this symbol "»" go back to Photoshop, select the Type Tool (T) and paste it. I used the font Gotham Bold with the size 32pt and the color #727e84. Put this arrow in the middle of the circle.
Duplicate the "right arrow" group (right-click on it and select Duplicate Group). Then go to Edit > Transform > Flip Horizontal. Put this new group in the left side of the image slider and name it "left arrow".
Step 10: Adding Content for the Image Slider
Now we will create an area for the description of the current image presented in the slider. Select the Rounded Rectangle Tool (U) and create a rectangle with the width 300px and the color #2c5a6b. The height depends on how much content you will include in this area. Name this layer "text bg" and set its opacity to 30%.Select the Type Tool (T) and add some content in this area. For the headline I used the font Futura Bold with the size 26pt and the color #ebebeb. For the block of text I used Helvetica Regular with the size 15pt and the color #ffffff. Add a Drop Shadow effect to these text layers using the settings from the image below.
Step 11: Create Web Buttons
Create a new group and name it "Description". This area can be used for a short bio of the freelancer. Select the Type Tool (T) and add a short paragraph of text. I used the font Helvetica Bold with the size 16pt and the color #555555. I also centered the text and set the leading (the distance between the lines of text) to 25pt from the Character panel (Window > Character).Now we will add some call-to-action buttons underneath the paragraph of text. Create a new group and name it "buttons". Then select the Rounded Rectangle Tool (U), set the Radius to 4px and create a rounded rectangle with the color #bbbbbb, as you see in the image below. Name this layer "button", double-click on it to open the Layer Style window and use the settings from the following image. For the Stroke effect I used the color #a7a7a7.
Select the Type Tool (T) and add some text to your button such as "View Portfolio »". I used the font Helvetica Bold with the size 15pt and the color #fafafa.
Create another button using the same settings, but change its color to #7fb6cd and the Stroke effect color to #6799ad.
Step 12: Creating a Separator
Create a new group and name it "separator". Select the Line Tool (U), set the Weight to 1px and create a horizontal line with the width 940px and the color #c8c8c8. Name this layer "1px line".Duplicate this layer (Ctrl/Cmd + J), move it one pixel upwards and change its color to #f2f2f2.
Now we will add a gradient to the separator. Select the Rectangular Marquee Tool (M) and create a selection above the two horizontal lines with the dimensions 940px by 18px. Create a new layer and fill the selection with black. Name this layer "gradient" and hit Ctrl/Cmd + D to deselect (1).
Double-click on the "gradient" layer to open the Layer Style window and use the settings from the following image (2).
Add a mask to the "separator" group (Layer > Layer Mask > Reveal All). Then select the Gradient Tool (G), hold down the Shift key and drag a black to transparent gradient in the left side of the separator to make it fade out. Do the same for the right side of the separator. Take a look at the following image for reference.
Then right-click on the "separator" group and select Convert to Smart Object.
Step 13: Creating the "Services" Area
Create a new group and name it "Main Content". We’ll design this area using tabs to showcase services that a freelancer might offer to their clients.Select the Rectangle Tool (U) and create a white rectangle with the dimensions 940px by 300px. Name this layer "main content bg" and add a 1px stroke effect to it using the color #bfc5c8.
Create a new group and name it "tabs". Select the Rectangle Tool (U) and create a rectangle with the height 44px at the top of the white rectangle using the color #b5bdc1. Name this layer "title bar", double-click on it to open the Layer Style window and use the settings from the following image.
Select the Rectangle Tool (U) again and create a rectangle with the height 4px and the color #9da5a9 at the top of the title bar. Name this layer "top line".
Select the Rectangle Tool (U) and create a white rectangle, as you see in the following image. This will be the active tab. Make sure this rectangle does not go over the "top line" layer and the stroke from the left side of the big white rectangle.
Select the Type Tool (T) and add the name of the service you want to display in this area. In my case, I put "Web Design" using the font Futura Bold with the size 17pt and the color #9ba3a8. I also added a Drop Shadow effect to this text layer.
Download this set of icons and open the .PSD file in Photoshop. Then move an icon that suits the name of the service into your initial document. I used the iMac icon. Put the icon in front of the service name, double-click on its layer and use the settings from the following image. The gradient that I used is from #b5bdc1 to #a1aab0.
Tip: to select the icon that you want without having to look through all the layers, select the Move Tool (V) and from the drop-down menu from the option bar above your image select ‘Layer’. Now hold down the Ctrl/Cmd key and click on the icon that you want to use. The layer of that icon will be automatically selected and you can move it into your web layout document.
Select the Type Tool (T) and add the name of other services to the title bar, such as "web development" or "iPad/iPhone apps". Use the same font that you used for the first service name (in my case Futura Bold), but change the color to white. Then add a Drop Shadow effect to these text layers using the settings from the image below.
Now add some icons for these services from the icons pack you downloaded earlier. Use the same layer style that you used for the first icon, but change the gradient colors to #f8f8f8 and #f0f0f0.
Step 14: Adding the Content to the "Services" Area
We will split the content for the "web design" service into two columns: "about" and "case studies". Create a new group and name it "column 1". Select the Type Tool (T) and write the word "About". I used the font Futura Book with the size 19pt and the color #9ba3a8.Download this iMac vector and open the .AI file in Illustrator. Select the iMac using the Selection Tool (V), copy it (Ctrl/Cmd + C), go back to Photoshop and paste it as smart object (Ctrl/Cmd + V). Name this layer "imac" and use Free Transform (Ctrl/Cmd + T) to change its size. Take a look at the following image for reference.
Select the Rectangle Tool (U) and create a rectangle over the computer screen. Name this layer "image_holder". Then open in Photoshop an image that you want to display on the screen and move it into your initial document using the Move Tool (V). Name this layer "image", put it over the screen, right-click on it and select Create Clipping Mask.
Select the Type Tool (T) and add a paragraph of text next to the image. I used the font Helvetica Regular with the size 13pt and the color #333333. Set the width of this text layer to 460px. Also, set the leading to 20pt from the Character panel to make the text more readable.
Now we will create a call-to-action button for the "services" area. First, select the Rounded Rectangle Tool (U), set the Radius to 5px and create a rounded rectangle with the dimensions 600px by 50px and the color #f3f3f3. Name this layer "button border", double-click on it to open the Layer Style window and use the settings from the following image. For the Stroke effect I used the color #d1d1d1.
Select the Rounded Rectangle Tool (U), set the Radius to 4px and create a rounded rectangle with the dimensions 586px by 36px and the color #7fb6cd in the middle of the gray rectangle. Name this layer "button", double-click on it to open the Layer Style window and use the settings from the following image. For the Stroke effect I used the color #6698ad.
Select the Type Tool (T) and add some text to your button. I used the font Helvetica with the size 17pt and the color #fafafa. Add a Drop Shadow effect to this layer using the settings from the image below.
Step 15: Designing an Area for Case Studies
Create a new group and name it "column 2". Select the Type Tool (T) and write the words "Case Studies". I used the font Futura Book with the size 19pt and the color #9ba3a8.Select the Rectangle Tool (U), hold down the Shift key and create a square with the dimensions 80px by 80px and the color #f7f7f7. Name this layer "border", double-click on it to open the Layer Style window and use the settings from the following image. For the Stroke effect I used the color #a3b2b9.
Create another square with the dimensions 70px by 70px in the middle of the "border" square shape. Name this layer "image_holder". Then open an image in Photoshop that you want to display in this area and move it into your initial document. Name this layer "image", put it over the "image_holder" layer, right-click on it and select Create Clipping Mask.
Hold down the Ctrl/Cmd key, select the "border", "image_holder" and "image" layers, and duplicate them five times (to duplicate these layers drag them over the "Create a new layer" button from the bottom of the Layers panel). Then arrange all your images as you see in the following image.
Step 16: Creating the "Portfolio" Area
Create a new group and name it "Portfolio". Then create a background for this area just like you did for the "services" section.Make this area 620px wide and 280px high. Copy the colors and layer styles for the background, title bar and top line from the "services" area. Then add a headline for this area and an icon.
Now we will create a highlight for the title bar. Select the Line Tool (U), set the Weight to 1px and create a horizontal white line at the bottom of the title bar. Leave a distance of 1px between the bottom edge of the title bar and this layer (1).
Add a mask to this layer (Layer > Layer Mask > Reveal All). Select the Gradient Tool (G), hold down the Shift key and drag a black to transparent gradient in the left side of the white line to make it fade away. Do the same for the right side of the line. Name this layer "highlight" and set its opacity to 70% (2).
Now we will add some images for the latest projects and a short description of each project. Add an image like the ones you created for the "case studies" area.
Select the Type Tool (T) and add some text next to it. For the headline I used the font Futura Book with the size 17pt and the color #9ba3a8. For the paragraph of text I used the font Helvetica Regular with the size 13pt and the color #9ba3a8. Also, set the leading for the paragraph to 18pt from the Character panel.
The width of this project area should be 280px. Put all these layers inside a group (Ctrl/Cmd + G) and name it "project #1". Duplicate this group three times and arrange them as you see in the image below.
Step 17: Creating the "Blog" Area
Create a new group and name it "Blog". Then create a content background just like you did for the "portfolio" section. Add a headline in the title bar and a suitable icon from the icons pack you downloaded.Select the Type Tool (T) and add a couple of posts to this area using the same fonts and colors that you used for the projects in the "portfolio" area. For the "Continue reading »" links I used the color #7fb6cd.
Now we will create a dashed line pattern which we will use for a horizontal separator. First, create a new document (Ctrl/Cmd + N) with the dimensions 10px by 1px.
Create a new layer (Ctrl/Cmd + Shift + N) and use the Rectangular Marquee Tool (M) to create a selection with the dimensions 6px by 1px. Fill this selection with black.
Hide the Background layer and go to Edit > Define Pattern. Give your pattern a name and click OK. Now you can close this document.
Go to your initial web layout document, select the Line Tool (U) and create a horizontal line with the dimensions 260px by 1px. Set the Fill of this layer to 0% and the Opacity to 20%.
Double-click on this layer to open the Layer Style window and use the settings from the following image for Pattern Overlay.
Step 18: Creating the Footer
Create a new group and name it "Footer". Then duplicate the "separator" layer from the "Description" group and move it to the "Footer" group. Use the Move Tool (V) to move this layer underneath the "portfolio" and "blog" areas.Now we will create an area for the Twitter feed. Create a new group and name it "recent tweets".
Move the bird icon from the icons pack you downloaded into your web layout document. Right-click on this layer and select Clear Layer Style. Then double-click on it to open the Layer Style window and use the settings from the following image. For the gradient I used the colors #8b8b8b and #c7c7c7.
Select the Type Tool (T) and write "Recent Tweets" next to the icon. I used the font Futura Bold with the size 15pt and the color #585858.
Select the Type Tool (T) and add a couple of tweets to this area. Make sure that the width of the text is 300px. I used the font Helvetica Regular with the size 12pt and the color #333333. For the links I used the color #7fb6cd.
I also added separators for the tweets using the Line Tool (U). I created two lines for each separator using the colors #c8c8c8 and #fefefe.
Add a button underneath the tweets that reads "Follow us »". Style this button just like the "Work With Me" button from the "description" area.
Step 19: Creating the "About" Area
Create a new group and name it "about". Then add an icon from the icons pack you downloaded. Copy the layer style from the "bird icon" layer and paste it to this layer.Select the Type Tool (T) and write "About" next to the icon using the same font and color that you used for "Recent Tweets" headline.
Now add a paragraph of text that is 300px wide.
Step 20: Creating a Contact Form
Create a new group and name it "contact". Then add the envelope icon from the icons pack you downloaded. Copy the layer style from the "bird icon" layer and paste it to this layer.Select the Type Tool (T) and write "Contact" next to the icon using the same font and color that you used for "Recent Tweets" and "About" headlines.
Select the Rectangle Tool (U) and create the rectangles of the contact form using the color #f7f7f7. Add a 1px Stroke effect to these layers using the color #8c9295. Then select the Type Tool (T) and write inside each box what it represents. I used the font Helvetica Regular with the size 13pt and the color #676f73.
Create a "Send" button underneath the contact form just like you created the "Follow us" button from the "Recent tweets" area.
Step 21: Adding Copyright Information
Create a new group and name it "Copyright". Duplicate the "separator" layer from the "Footer" group and move it into the "Copyright" group.Flip this layer vertically by going to Edit > Transform > Flip Vertical. Use the Move Tool (V) to move this layer underneath the footer area.
Select the Type Tool (T) and write a copyright statement. I used the font Helvetica Regular with the size 12pt and the color #5a5a5a.
Tutorial Summary
We’re finished! I hope you enjoyed this tutorial and you learned some new techniques for designing web layouts in Photoshop. Share your thoughts in the comments section below. Thank you for reading.

0 comments:
Post a Comment