Here we are going to learn some 3D tool and material techniques in
Photoshop. We are going to make 3D Soda Can in Photoshop. This tutorial
will be in two parts. In first part we will be making 3D Soda Can then
in second part we will be giving some lighting effects over it. Both
parts will be included in one tutorial. So lets start.

1. Create a new file with the following size and resolution:

2. Go to 3D >> New Shape From Layer >> Soda Can:

3. (If a box came then hit Ok), now you can see the Soda Can on the canvas:

4. Change the view by using 3D Rotate View tool :
:

5. Double click on the Background layer for material editor:

6. Select the cap_material and change the glossiness value to 50%:

7. Then select the label_material change the Glossiness value to 20%:

8. Click on the Background.psd and click on the load texture.
9. Use the following texture:

10.you will see the texture on the Can:

11. Now go to 3D >> Rasterize to rasterize the Can:

12. Create a new file and use the following size and resolution:

13. Fill the background layer with the black color:

14. Create a new layer and rename the layer as Floor:

15. By using Rectangular Marquee tool select the bottom part and fill it with # 828282 color:

16. Now by using Eraser Tool with feathered edges, with the brush Radius 400 and hardness 0, erase the following part of the floor layer:

17. Now copy and paste the Can from previous file over the floor layer:

18. Now create a new shadow layer below the Can layer:

19. Create black shadow by using Elliptical Marquee tool :
:

Fill it with Black color:

20. Select the shadow layer and go to Filter >> Blur >> Gaussian Blur:

21. Change the blur Radius value to 25 pixels and click ok . You will see the smooth shadow effect:

22. Select the shadow layer and press (Ctlr + T) for transformation and the change the shape as shown below:

23. Now select both shadow and can layer and copy the layers by pressing (Alt + Arrow Key) and place the can in the following position and sizes:

24. So far we have completed our Soda Can, now we are going to give some special effects over it. For this purpose take a new file of the following size and resolution:

25. Create a new layer and fill with black color:

26. Create a new layer again and select Brush Tool , change the brush radius to 500 pixel:

27. Paint with Brush on the center of canvas with the #d6d6d6 color as:

28. Create a new layer for adding some smoke effect and reduce the opacity of the layer to 40%:

I used cloud brush to create some smoke effect you can download this brush by clicking here.

29. Paint the cloud brush like shown below, and also change the size of the brush with color #d6d6d6:

30.Now I am going to add new layer in this layer im going to create land surface. Make a selection with Rectangular Marquee tool and fill with color #d6d6d6:

31. Erase the top part of the fill area with Eraser tool , size of the brush should be 200 pixels and hardness 0%:

32. Now we have to paste our Soda Cans along with their shadows here in this file, so go to previous file in which we made Soda Cans, select Soda Cans along with their shadows and move them into this file above surface just created, adjust the size and position of the Cans so that you may have this:

33. Now its time to add some glossiness on the surface. Take new layer and start with white colored brush size should be 90% pixels and hardness 0%:

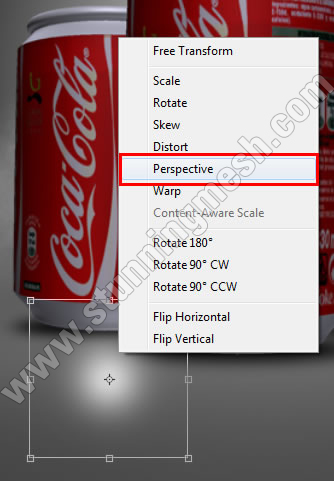
34. Now press (Ctrl + T ) for transform. Right click on the transform area and click on the perspective:

Change the perspective into following shape:

35. Copy this layer and place at the following positions:

36. Now its time to add some (fill or Adjustment layers) for post processing. Go to the layer panel and click on the (fill or Adjustment layers) button and add photo filter from list:

37. Change the following adjustments:

you will get something like this:

38. In this step I am going to add Level Adjustment, do the same process, go to the layer panel click on the (fill or Adjustment layers) button and add levels. This time change the following parameters:

39. Now add brightness and contarst from the (fill or Adjustment layers) change the following parameters:

We will get finally this image, hopefully you have enjoyed making this tutorial:


1. Create a new file with the following size and resolution:

2. Go to 3D >> New Shape From Layer >> Soda Can:

3. (If a box came then hit Ok), now you can see the Soda Can on the canvas:

4. Change the view by using 3D Rotate View tool

5. Double click on the Background layer for material editor:

6. Select the cap_material and change the glossiness value to 50%:

7. Then select the label_material change the Glossiness value to 20%:

8. Click on the Background.psd
9. Use the following texture:

10.you will see the texture on the Can:

11. Now go to 3D >> Rasterize to rasterize the Can:

12. Create a new file and use the following size and resolution:

13. Fill the background layer with the black color:

14. Create a new layer and rename the layer as Floor:

15. By using Rectangular Marquee tool

16. Now by using Eraser Tool

17. Now copy and paste the Can from previous file over the floor layer:

18. Now create a new shadow layer below the Can layer:

19. Create black shadow by using Elliptical Marquee tool

Fill it with Black color:

20. Select the shadow layer and go to Filter >> Blur >> Gaussian Blur:

21. Change the blur Radius value to 25 pixels and click ok . You will see the smooth shadow effect:

22. Select the shadow layer and press (Ctlr + T) for transformation and the change the shape as shown below:

23. Now select both shadow and can layer and copy the layers by pressing (Alt + Arrow Key) and place the can in the following position and sizes:

24. So far we have completed our Soda Can, now we are going to give some special effects over it. For this purpose take a new file of the following size and resolution:

25. Create a new layer and fill with black color:

26. Create a new layer again and select Brush Tool

27. Paint with Brush on the center of canvas with the #d6d6d6 color as:

28. Create a new layer for adding some smoke effect and reduce the opacity of the layer to 40%:

I used cloud brush to create some smoke effect you can download this brush by clicking here.

29. Paint the cloud brush like shown below, and also change the size of the brush with color #d6d6d6:

30.Now I am going to add new layer in this layer im going to create land surface. Make a selection with Rectangular Marquee tool

31. Erase the top part of the fill area with Eraser tool

32. Now we have to paste our Soda Cans along with their shadows here in this file, so go to previous file in which we made Soda Cans, select Soda Cans along with their shadows and move them into this file above surface just created, adjust the size and position of the Cans so that you may have this:

33. Now its time to add some glossiness on the surface. Take new layer and start with white colored brush size should be 90% pixels and hardness 0%:

34. Now press (Ctrl + T ) for transform. Right click on the transform area and click on the perspective:

Change the perspective into following shape:

35. Copy this layer and place at the following positions:

36. Now its time to add some (fill or Adjustment layers) for post processing. Go to the layer panel and click on the (fill or Adjustment layers) button

37. Change the following adjustments:

you will get something like this:

38. In this step I am going to add Level Adjustment, do the same process, go to the layer panel click on the (fill or Adjustment layers) button and add levels. This time change the following parameters:

39. Now add brightness and contarst from the (fill or Adjustment layers) change the following parameters:

We will get finally this image, hopefully you have enjoyed making this tutorial:

Furqan is having more than 8 years of experience in graphics design, 3d
modeling and animation and over the past 8 years he is deeply involved
in any form of art like website designs, Music, concept sketch,
automobile concept design, character concept sketch, logo design,
animations, Photo-real 3d product/architecture visualization.


0 comments:
Post a Comment